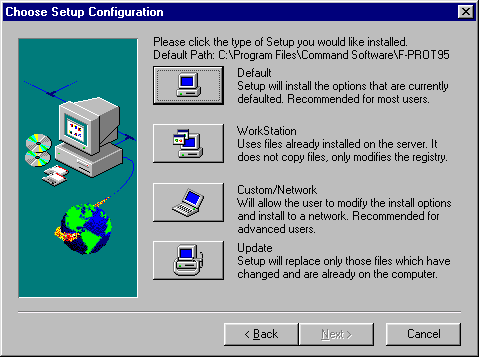
Setup Configuration Screen
| Command AntiVirus for Windows 95 adheres
to the installation and removal parameters specified by
the Microsoft Corporation. It is strongly recommended that you exit all Windows programs before running the setup program. |
- Click on the Start button.
- Click on Run.
- Insert Disk #1 into A.
- Type A:setup and click OK.
- Click on Next.
- Select Default from the Setup Configuration screen.
Command AntiVirus for Windows will begin the installation process.
There are many ways to create shortcuts for easy access to Command AntiVirus. The following is one example.
- Right click on the desktop.
- Click on New.
- Click on Shortcut.
- Select Browse.
- Double-click on Program Files.
- Double-click on Command Software.
- Double-click on F-PROT95.
- Select F-PROT32.EXE then Open.
- Choose Next and select Finish.
The advanced installation section covers the options available to you if you do not choose Default.
Follow steps 1-5 of Quick Install to access the Setup Configuration screen displayed below.

Setup Configuration Screen
Select the Workstation option if Command AntiVirus is already installed on your file server. The program files are not installed with this option, but the registry files on the workstation are modified. This is a convenient way to setup real-time protection and icons at the workstation and run the program from the file server.
If you select the Custom/Network option you have the ability to choose the components and location of the Command AntiVirus directory.
From this screen, you can install (recommended) or not install F-Agent. F-Agent is necessary for scheduled scanning to occur. It will look at FPT (F-PROT Task) files for scheduled scans and then execute them. Additionally, you can install DVP.VXD, the Virtual Device Driver for the Windows 95 environment. DVP will check the boot sector of all floppies inserted into the disk drive -- as well as program files -- prior to execution.
You may select or name the program folders for the Command AntiVirus program and for F-Agent by using the Custom/Network option.
As you access each screen the default setting(s) will be displayed. If you want to accept the setting simply choose Next.
Using the Update option is a quick and easy way to update your existing version of Command AntiVirus for Windows 95. As there are always new viruses, it is critical to keep the most current version of Command AntiVirus running.
Command AntiVirus for Windows 95 can be easily removed.
- Double-click on My Computer.
- Double-click on Control Panel.
- Double-click on Add/Remove Programs.
- Click on Command AntiVirus for Windows 95.
- Click on Remove.
Follow the default suggestions on the screen.
If you did not choose to make a Command AntiVirus rescue disk during installation you may either run the setup program again and one will be created automatically for you, or you may create one manually. Be certain that your system has been checked for viruses before beginning this task.
If you prefer to make a Command AntiVirus rescue disk manually, start by making a copy of the Windows 95 STARTUP diskette that you created while installing/updating Windows 95. It will then be necessary to add a copy of the Master Boot Record of your hard drive and the Command AntiVirus for DOS files.
| If you skipped this important step during the installation of Windows 95, make one now, copy it and put the original in a safe place. This is how: |
Double-click on My Computer.
- Double-click on Control Panel.
- Double-click on Add/Remove Programs.
- Select Startup Disk.
- Select Create Disk.
When it is finished, write-protect it, copy it and put it in a safe place.
These steps will ensure that you have a copy of the Master Boot Record and the boot sector of your hard drive as a precaution. This will also copy the FIXDISK utility to your disk.
- Open a DOS window (go to the MS-DOS Prompt) .
Change Directory to:C:\Progra~1\Comman~1\f-prot95 or type:
CD "PROGRAM FILES\COMMAND SOFTWARE\F-PROT95- Remove the write-protection from the copy of the STARTUP diskette you just made and insert it into drive A.
Type the following:
FIXDISK RESCUE CREATE(This stores a copy of the MBR/BS on drive C).Type the following:
FIXDISK RESCUE CREATE A:(This stores a copy of the MBR/BS on drive A:)Type the following:
COPY FIXDISK.EXE A:\- Write-protect the diskette and put it with the original.
Further information on the FIXDISK utility is available in the chapter titled "Boot Record Support".
The files listed below should now be added to your Command AntiVirus rescue disk. They may be obtained from the installation diskettes or from the Command AntiVirus directory that was created during installation. It is also acceptable to simply use the installation diskette containing F-PROT.EXE to run Command AntiVirus for DOS.
F-PROT.EXE
SIGN.DEF
ENGLISH.TX0