

This chapter contains information that will help you through the installation process. You may choose either the Windows Installation below or the DOS Installation located later in this chapter. You do not need to use both methods. Either one installs all of the necessary files to protect your system in both the DOS and the Windows environment.If you want to install Command AntiVirus over a network, please refer to the Network Administration chapter.
 |
To insure that your system is virus-free, we recommend that you run the DOS scanner from Command AntiVirus Installation Disk #1 before installing the product. To begin the scan: |
- Insert Command AntiVirus Disk #1 into drive A.
- At the command line, type A:
- Press Enter.
- When the system displays the A: prompt, type CD\
- Press Enter.
- Type F-PROT /HARD
- Press Enter. The program scans all physical hard drives.
If the system reports a virus prior to or during installation, you must disinfect the drive before continuing. For more information, refer to If a Virus is Found located later in this chapter.
This section provides instructions on installing Command AntiVirus from Windows. Although the default installation procedure installs the entire product automatically, the program gives you the opportunity to decide which major components you want to install. You also have the option to configure some of the components that you select. For more information, refer to Customizing The Windows Installation.
 |
NOTE: Do not run a DOS shell under Windows to install. |
The following instructions will help you through the installation:
- From the menu bar at the top of the Program Manager, select File, then Run. The system displays the Run dialog box.
- Insert Command AntiVirus Disk #1 into drive A.
- Type A:SETUP
- Press Enter. After startup, the system displays the Welcome screen.
- Press Enter to continue. The system displays the Command AntiVirus Setup dialog box. If you want to customize the installation, refer to Customizing The Windows Installation. If not, continue with the next step.
- Press Enter. The system displays an indicator bar showing how the installation is progressing.
 |
If the system detects an existing version of Command AntiVirus, a dialog box appears. This dialog box allows you to continue upgrading your existing version of Command AntiVirus or to install the newer version to a separate directory. |
When the copying is complete, the system prompts you to insert Command AntiVirus Disk #2 into drive A.
- Press Enter to continue.
- Repeat Steps 6 and 7 for Disk #3. When the copying is complete, the system displays the Modify AUTOEXEC.BAT dialog box. If you want to change the modifications that will be made to your AUTOEXEC.BAT, refer to Modifying AUTOEXEC.BAT. If not, proceed to the next step.
- Press Enter. The system displays the Program Group dialog box. If you want to have the program icons created in an existing program group, refer to Program Group located later in this chapter. If not, proceed to the next step.
- Press Enter. The system displays the Reboot dialog box that prompts you to remove any disks from Drive A: before restarting the system.
- Press Enter to restart.
 |
If your system does not restart, close down any applications, including Windows, and press Ctrl+Alt+Delete to restart your system and begin the anti-virus protection. |
- Create a Rescue Disk. Refer to Creating a Rescue Disk located later in this chapter.
Command AntiVirus gives you the opportunity to customize the installation. The program allows you to make the following choices:
- Perform daily scans of your computer
- Provide for real-time virus scanning
- Install integrity checking
- Provide for network support
The Command AntiVirus Setup dialog box allows you to configure some of the main components of Command AntiVirus as they are installed.
As in the following view, the dialog box contains certain default information. For example, the default Boot Drive is C, the Type of Installation is First-time Install and the Install Directory is C:\F-PROT. We recommend that you accept these default values.
 |
All references to drives and directories are based on a standard installation to C:\F-PROT. If you change the drive and directory path during installation, you must make those changes wherever C:\F-PROT is referenced. |
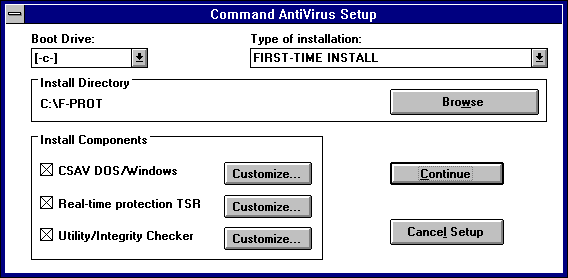
Command AntiVirus Setup Dialog Box
In the Command AntiVirus Setup dialog box, you also have the option to install the program's three main components:By default, the program selects all three components for installation. To clear a component selection, use your mouse to remove the X from the appropriate check box. This section contains descriptions that will help you decide which components you want to install and/or customize.
- Command AntiVirus DOS/Windows
- Real-time protection
- Utility/Integrity Checker
When you select a component for installation, you can configure that component by clicking on its Customize button. When you click on the Customize button, the customize dialog box for that component appears. Use the options in the dialog box to configure the component.
CSAV DOS/Windows
If you click on the Customize button for CSAV DOS/Windows in the Command AntiVirus Setup dialog box, the following dialog box appears:
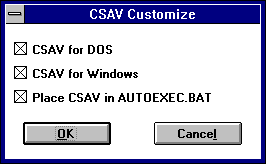
CSAV Customize Dialog Box
The installation program installs all three components by default. If you decide not to install any of these components, you can clear a component selection by removing the X from the appropriate check box. The following descriptions will help you decide which components you want to install.
CSAV for DOS
Selecting this option installs F-PROT.EXE in the installation directory. F-PROT.EXE is the DOS-based scanner for Command AntiVirus. F-PROT.EXE must be installed if you want to begin an automatic once-a-day scan of your computer from the AUTOEXEC.BAT file. When the program makes changes to the AUTOEXEC.BAT during installation, it places the following statement in the AUTOEXEC.BAT:This statement begins the automatic once-a-day scan of your computer's local hard drives.C:\F-PROT\F-PROT /HARD /TODAY
CSAV for Windows
This option installs F-PROTW.EXE, in the installation directory. F-PROTW.EXE is the Windows-based graphical user interface (GUI) for Command AntiVirus for Windows.
Place CSAV in AUTOEXEC.BAT
 |
NOTE: This option places a command in your AUTOEXE.BAT that starts a daily DOS-based scan of the local hard drives when you start your computer for the first time on any given day. For more information, refer to Scan once a day in the Command AntiVirus in Windows chapter. |
Real-time Protection
When you select the Real-Time Protection TSR option from the Command AntiVirus Setup dialog box, the following dialog box appears:
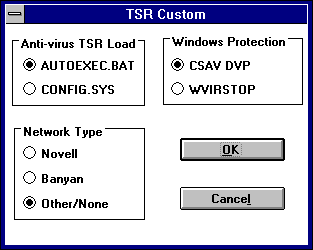
TSR Custom Dialog Box
Within the TSR Custom dialog box you can make the following choices:You can use the following descriptions to help you decide which components you want to install:
- Set the load location for the DOS-based real-time protectionin DOS TSR, VIRSTOP
- Select the type of real-time Windows anti-virus protection
- Install network support for Command AntiVirus
This section allows you to load the DOS-based anti-virus TSR, VIRSTOP, through either your AUTOEXEC.BAT or CONFIG.SYS file. VIRSTOP is required for real-time anti-virus protection in the DOS environment.
VIRSTOP in AUTOEXEC.BAT
By default, Command AntiVirus adds two lines to your AUTOEXEC.BAT file. These lines start VIRSTOP's real-time virus scanning.
VIRSTOP in CONFIG.SYS
As an alternative to adding a line for VIRSTOP in your AUTOEXEC.BAT, you can add a line to your CONFIG.SYS file instead. This alternative provides anti-virus protection as early as possible by beginning protection almost as soon as you start your computer.
This section allows you to choose the type of realtime scanning protection.
CSAV DVP
Command AntiVirus installs DVP (Dynamic Virus Protection) for Windows as the default. DVP provides a Windows-based protection against viruses by providing real-time scans of each program run in the Windows environment. This protection also includes programs run in a DOS box. Because of this complete virus protection, DVP is the preferred real-time scanning method.
WVIRSTOP
This option allows VIRSTOP's notification messages to be displayed in a Windows dialog box. While VIRSTOP provides a DOS-based real-time protection, it uses a smaller set of virus signatures to conserve memory. Because of these limitations, VIRSTOP detects fewer viruses in comparison to DVP. For example, VIRSTOP does not detect any macro viruses.
 |
Users of Novell or Banyan networks can install support by clicking on the appropriate radio button under Network Type. This support includes the following TSR programs that you can use to broadcast notification of a detected virus infection: |
NOVELL
NOVCAST notifies the user on a NetWare network of a detected virus infection. You can also set NOVCAST to notify the system administrator and other users. If you choose, NOVCAST can work with VIRSTOP and WVIRSTOP to provide virus notification in the Windows environment.
BANCAST
BANCAST notifies users on Banyan Vines networks of a detected virus infection. This notification also works within Windows. BANCAST options include adding the reported incident to a virus log file on the server and/or notifying other users on the network.
NONE
Select this option if you do not want to install Network support.For more information about TSR configuration and operation refer to Real-time Protection in the Command AntiVirus In DOS chapter.
Utility/Integrity Checker
When you select Utility/Integrity Checker from the Command AntiVirus Setup dialog box, the following dialog box appears: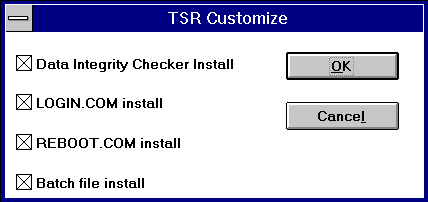
Integrity Checker Customize Dialog BoxThe installation program installs all of the Integrity Checker Customize options by default. You can clear any of these options by removing the X from the appropriate check box. The following descriptions will help you decide which options you want to install.
Data Integrity Checker Install
Selecting this option installs the CS-TSR.COM call in the AUTOEXEC.BAT file. The real-time integrity checker notifies you when you attempt to run an executable file that has changed in size or content.
LOGIN.COM Install
This option copies LOGIN.COM to the installation directory. LOGIN.COM calls the NetWare LOGIN sequence from a batch file. For more information about LOGIN.COM, refer to the Network Administration chapter.
REBOOT.COM Install
This option copies REBOOT.COM to the installation directory. REBOOT.COM forces a restart of the system after modifications have been made to the configuration files. For more information about REBOOT.COM, refer to the Network Administration chapter.
Batch File Install
This options copies several small batch files to the installation directory. These files are useful for updates and central administration.
 |
NOTE: After you have completed your changes, if any, in the Command AntiVirus Setup dialog box, you can continue to Step 6 of the Windows Installation. |
If you selected Real-time protection TSR in the Command AntiVirus Setup dialog box, the following dialog box appears:
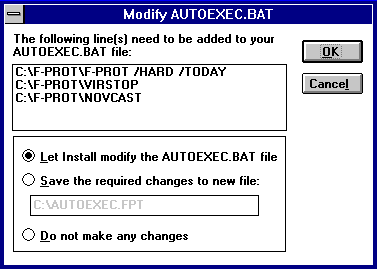
Modify AUTOEXEC.BAT Dialog Box
The following descriptions will help you decide which method to select:
Let Install modify the AUTOEXEC.BAT file
This option adds three lines above the last line of your AUTOEXEC.BAT file. These lines activate real-time scanning and notification. The following table contains a description of each line:
LINES ADDED TO AUTOEXEC.BAT
AUTOEXEC COMMAND ACTION PERFORMED C:\F-PROT\F-PROT /HARD /TODAY Scans your system's hard drive(s) once a day when your system starts for the first time. C:\F-PROT\VIRSTOP Loads VIRSTOP, the DOS real-time protection program. C:\F-PROT\NOVCAST Loads NOVCAST, enabling the broadcasting of virus alerts across a Novell network.
Save the required changes to new file
This option saves the modified AUTOEXEC.BAT information to a userspecified file. If you do not specify a filename, the program saves the information to the AUTOEXEC.FPT file. Your original AUTOEXEC.BAT remains unchanged. You can then look at the user-specified file and decide if you would like to make the changes to your original AUTOEXEC.BAT.
Do not make any changes
This options makes no changes to your AUTOEXEC.BAT file. If this is a new installation of Command AntiVirus, you need to add the following lines at the bottom of your AUTOEXEC.BAT to enable DOS realtime protection and Novell (or Banyan) network broadcasting:C:\F-PROT\VIRSTOPNOVCAST and BANCAST work with VIRSTOP in DOS and WVIRSTOP in Windows. For more information about Novell or Banyan network broadcasting refer to the Network Administration chapter.
C:\F-PROT\NOVCAST (or BANCAST if a Banyan network)
The following dialog box allows you to select the Program Group that contains the program icons. The default creates a new group called "Command AntiVirus."
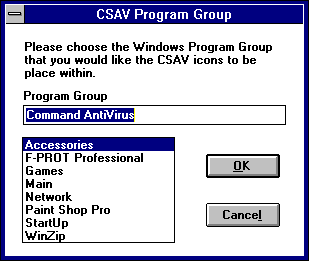
CSAV Program Group Dialog Box
You can have the program icons created in an existing program group by selecting a name from the list box or you can create a totally new group by typing in a new name in the Program Group text field.
As an alternative to installing Command AntiVirus from within Windows, you can install the program from the DOS command line.Although the default installation installs the entire product automatically, the program gives you the opportunity to decide which major components you want to install. You also have the option to configure some of the components that you select. For more information, refer to Customizing The DOS Installation.The following instructions will help you through the installation:
- Insert Command AntiVirus Disk #1 into drive A.
- At the DOS command line, type A:INSTALL
- Press Enter. The system displays the Welcome screen.
- Press Enter to continue. The system displays the following screen:
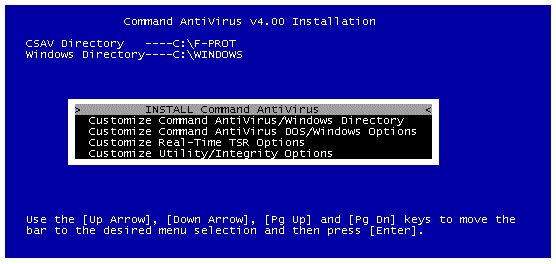
Main Menu
- If you wish to customize the installation, refer to Customizing The DOS Installation. If not, proceed to the next step.
- Select Install Command AntiVirus.
- Press Enter. The system displays the AUTOEXEC.BAT Changes screen. If you want to change the modifications that the program will make to your AUTOEXEC.BAT, refer to AUTOEXEC.BAT Changes. If not, continue to Step 8.
 |
NOTE: If the system detects an existing version of Command AntiVirus, the following screen appears: |
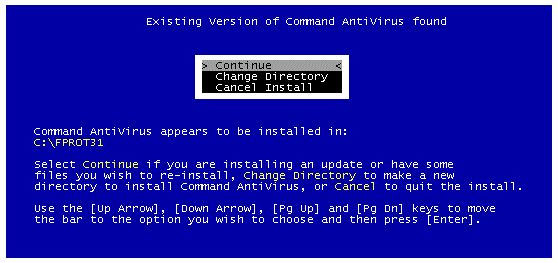
Existing Version Menu
If you select Continue, the system replaces the existing files by writing over them.Change Directory places the new Command AntiVirus files in another directory which the program asks you to specify.
Cancel Install ends the installation.
- Press Enter. The system begins copying the files. When the copying is complete, the system prompts you to insert Command AntiVirus Disk #2 into Drive A.
- Press Enter to continue.
- Repeat Steps 8 and 9 for Disk #3. When the copying is complete, the system displays a pop-up to let you know that the program has modified the AUTOEXEC.BAT and that the program has renamed the original AUTOEXEC.BAT to AUTOEXEC.BAK.
- Press Enter. The system displays an information screen. When you have read the information,
- Press Enter to continue.
- Remove Disk #3 from drive A.
- Press Enter. The program restarts your system.
 |
NOTE: If the system does not restart, press Ctrl+Alt+Del to restart. |
- Create a Rescue Disk. Refer to Creating a Rescue Disk located later in this chapter.
Command AntiVirus gives you the opportunity to customize the installation. The program allows you to make the following choices:
- Select the drive and directory of the installation files
- Select the components the program installs
- Perform daily scans of your computer
- Provide for real-time virus scanning
- Install integrity checking
- Providing for network support
This option prompts you to select the drive and directory where the program installs Command AntiVirus. We recommend the default which is C:\F-PROT. When you select this option from the Main Menu, the following screen appears:
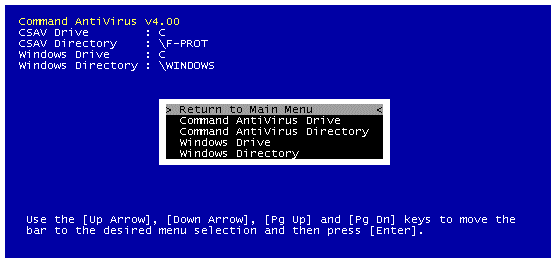
DOS/Windows Directory Menu
The system defaults are in the upper left-hand corner of the screen. You can change the default options by selecting the option and pressing Enter. The system provides drive choices and prompts you to enter a new directory name.
 |
NOTE: All references to drives and directories are based on a standard installation to C:\FPROT. If you change the drive and directory path during installation, you must make those changes wherever C:\F-PROT is referenced. |
This option allows you to select the components you want to install. When you select this option from the Main Menu, the following screen appears:
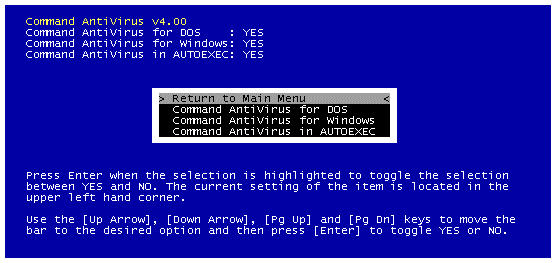
DOS/Windows Options Menu
The system defaults are shown in the upper left-hand corner of the screen. You can choose the components to be installed by selecting the desired option. Selecting and pressing Enter changes the setting for that option from Yes to No.
The following descriptions will help you decide which components you want to install:
Selecting this option installs F-PROT.EXE in the installation directory. F-PROT.EXE must be installed if you want to begin an automatic once-a-day scan of your computer from the AUTOEXEC.BAT file. When the program makes changes to the AUTOEXEC.BAT during installation, it places the following statement in the AUTOEXEC.BAT:
C:\F-PROT\F-PROT /HARD /TODAY
This statement begins the automatic once-a-day scan of your computer's local hard drives.
This option installs F-PROTW.EXE in the installation directory. FPROTW.EXE is the Windows-based graphical user interface (GUI) for Command AntiVirus for Windows.
 |
NOTE: This option places a command in your AUTOEXE.BAT file that starts a daily DOS-based scan of the local hard drives when you start your computer for the first time on any given day. For more information, refer to Scan once a day in the Command AntiVirus In Windows chapter. |
This option allows you to make the following choices:When you select this option from the Main Menu, the following screen appears:
- Set the location for the DOS-based TSR, VIRSTOP
- Choose daily scans of all local hard drives
- Install network support for Command AntiVirus.
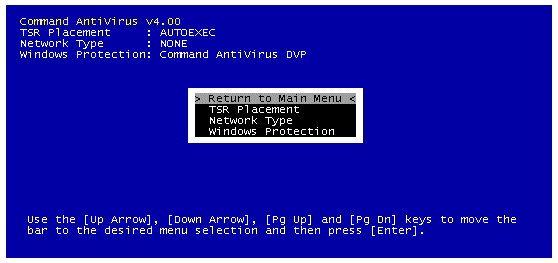
TSR Options Menu
The system defaults are in the upper left-hand corner of the screen. These defaults insert the following lines before the last line of your AUTOEXEC.BAT file:
C:\F-PROT\F-PROT /HARD /TODAY

C:\F-PROT\VIRSTOP

C:\F-PROT\NOVCAST
The first line performs a daily scan of all local hard drives when you start your computer for the first time on any given day.
The second line loads an anti-virus TSR called VIRSTOP. VIRSTOP.EXE provides anti-virus protection in the DOS environment by examining each file prior to running as well as checking the boot sectors of floppy disks.
The third line loads a Windows and NetWare broadcasting utility called NOVCAST. NOVCAST notifies users on a NetWare network of a detected virus infection and can work with VIRSTOP and WVIRSTOP to provide virus notification in the Windows environment.
You can change the options by selecting and pressing Enter. The following descriptions will help you decide which components you want to install.
 |
NOTE: If you need to have the last line of your AUTOEXEC.BAT load before the three lines above, you will need to modify your AUTOEXEC.BAT. |
This section allows you to load the DOS-based anti-virus TSR, VIRSTOP, through your AUTOEXEC.BAT or CONFIG.SYS file. VIRSTOP is required for realtime anti-virus protection outside of Windows. When you select this option from the TSR Options Menu, the following screen appears:

TSR Placement Menu
The system default is in the upper left-hand corner of the screen. You can change the default option by selecting the new option and pressing Enter. The following descriptions will help you decide which option you want to install:
AUTOEXEC.BAT
By default, Command AntiVirus adds three lines to your AUTOEXEC.BAT file. These lines startup VIRSTOP's real-time virus scanning and notification.
CONFIG.SYS
As an alternative to adding a line for VIRSTOP in your AUTOEXEC.BAT, you can add a line to your CONFIG.SYS file instead. This alternative provides anti-virus protection as early as possible by beginning protection almost as soon as you start your computer.
NONE
You can select this option if you do not want to install VIRSTOP anti-virus protection.
 |
This option allows you to install network support. When you select this option from the TSR Options Menu, the following screen appears: |
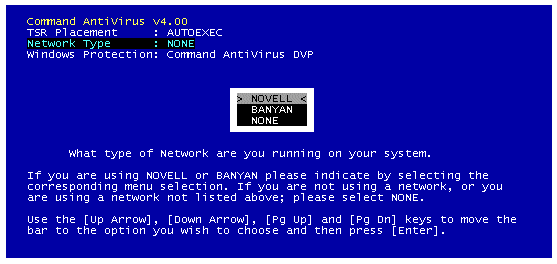
TSR Network Type Menu
The system default is in the upper left-hand corner of the screen. You can change the default option by selecting the new option and pressing Enter. The following descriptions will help you decide which options you want to install.
NOVELL
This option installs network support for NetWare users. This support includes NOVCAST, a TSR program, that notifies the user on a NetWare network of a detected virus infection. You can also set NOVCAST to notify the system administrator and other users. If you choose, NOVCAST can work with VIRSTOP and WVIRSTOP to provide virus notification in the Windows environment.
BANCAST
This option installs network support for Banyan Vines users. This support includes BANCAST, a TSR program that notifies users on Banyan Vines networks of a detected virus infection. This notification also works within Windows. BANCAST options include adding the reported incident to a virus log file on the server and/or notifying other users on the network.
NONE
You can select this option if you do not want to install network support.
When you select this option from the TSR Options Menu, the following screen appears:
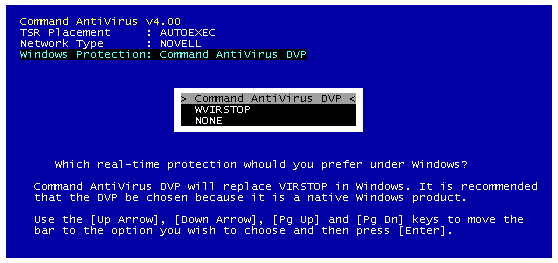
Windows Protection Menu
This menu allows you to select Command AntiVirus Dynamic Virus Protection (a Windows-based program) or WVIRSTOP.EXE, which uses the DOS-based VIRSTOP to detect viruses in the Windows environment. The default, Command AntiVirus DVP, is recommended.
The system default is in the upper left-hand corner of the screen. You can change the default option by selecting the new option and pressing Enter. The following descriptions will help you decide which options to install.
Command AntiVirus DVP
Command AntiVirus installs DVP (Dynamic Virus Protection) for Windows as the default. Command AntiVirus DVP provides a Windows-based real-time protection against viruses by providing real-time scans of each program run in the Windows environment. This protection also includes programs run in a DOS box. Because of this complete virus protection, DVP is the preferred real-time scanning method.
WVIRSTOP
This option allows VIRSTOP's notification messages to be displayed in a Windows dialog box. While VIRSTOP provides a DOS-based real-time protection, it uses a smaller set of virus signatures to conserve memory. Because of these limitations, VIRSTOP detects fewer viruses in comparison to DVP. For example, VIRSTOP does not detect any macro viruses.
This option controls the installation of the CHECK.EXE, LOGIN.COM, REBOOT.COM and batch utilities. The default is to install them all. When you select this option from the Main Menu, the following screen appears:
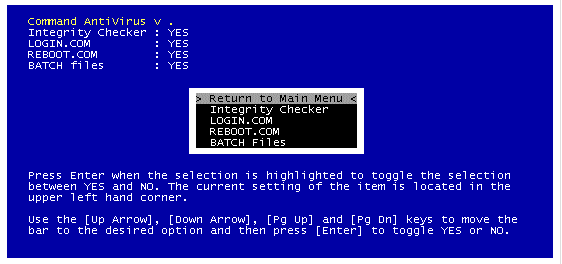
Utility/Integrity Options Menu
The system defaults are in the upper left-hand corner of the screen. You can change the default options by selecting the new option. Selecting and pressing Enter changes the option from Yes to No. The following descriptions will help you decide which options you want to install.
Selecting this option installs the CS-TSR.COM call in the AUTOEXEC.BAT file. The real-time integrity checker notifies you when you try to run an executable file that has changed in size or content.
This option copies LOGIN.COM to the installation directory. LOGIN.COM calls the NetWare LOGIN sequence from a batch file. For more information about LOGIN.COM, refer to the Network Administration chapter.
This option copies REBOOT.COM to the installation directory. REBOOT.COM forces a restart of the system after modifications have been made to the configuration files. For more information about REBOOT.COM, refer to the Network Administration chapter.
This option copies several small batch files to the installation directory. These files are useful for updates and central administration.
 |
NOTE: After you have completed your changes, if any, you can continue to Step 6 of the DOS Installation. |
When the program is about to make changes to the AUTOEXEC.BAT file, the following screen appears:

AUTOEXEC.BAT Changes Menu
The following descriptions will help you decide which method to select.
This option adds three lines above the last line of your AUTOEXEC.BAT file. These lines activate real-time scanning and notification. The following table contains descriptions of each line:
LINES ADDED TO AUTOEXEC.BAT
AUTOEXEC COMMAND ACTION PERFORMED C:\F-PROT\F-PROT /HARD /TODAY Scans your system's hard drive(s) once a day when your system starts for the first time. C:\F-PROT\VIRSTOP Loads VIRSTOP, the DOS real-time protection program. C:\F-PROT\NOVCAST Loads NOVCAST, enabling the broadcasting of virus alerts across a Novell network.
 |
NOTE: If you need to have the last line of your AUTOEXEC.BAT load before the three lines above, you will need to modify your AUTOEXEC.BAT. |
This option saves the modified AUTOEXEC.BAT information to the AUTOEXEC.FPT file. Your original AUTOEXEC.BAT remains unchanged. You can then look at the AUTOEXEC.FPT file and decide if you would like to make the changes to your original AUTOEXEC.BAT.
This options makes no changes to your AUTOEXEC.BAT file. If this is a new installation of Command AntiVirus, you need to add the following lines at the bottom of your AUTOEXEC.BAT to enable DOS realtime protection and Novell (or Banyan) network broadcasting:
C:\F-PROT\VIRSTOP
C:\F-PROT\NOVCAST (or BANCAST if a Banyan network)
NOVCAST and BANCAST work with VIRSTOP in DOS and WVIRSTOP in Windows. For more information about Novell or Banyan network broadcasting refer to the Network Administration chapter.
 |
Sooner or later, every computer user will need to restart the computer from a floppy disk drive. A few minutes work now can save you many hours of grief later. |
The following instructions will help you create a rescue disk. A rescue disk allows you to start your system in DOS and then run Command AntiVirus from the diskette.
Make sure that you have a blank high-density diskette on hand and that the diskette and your system are virus-free.
At the DOS command line, change to the F-PROT directory and type:
RESCUE
or, if you are in Windows, select File/Run and type:
\F-PROT\RESCUE
- Press Enter.
- Insert a floppy diskette in drive A.
- Press Enter. The system displays a warning that the diskette will be formatted.
- Press Enter. The system prompts you to insert a diskette.
- Press Enter. The system formats the diskette. When the formatting is complete, the system asks if you would like to format another diskette.
- Type N.
- Press Enter. The system begins copying the files.
- When the system has finished copying, remove the diskette from drive A.
- Label this diskette "Command AntiVirus Rescue Diskette For (Users Computer ID)."
- Set the write-protect tab to prevent any modifications to the diskette.
 |
Because the rescue file on the diskette is machine-specific, this diskette is only for the computer used to create the file. |
If you want to modify the rescue disk, you can use the following instructions to create the rescue disk manually. Make sure that your system is virus-free before continuing.
 |
NOTE: These instructions work only with a high-density diskette. If you are using low-density media, you will need to use two blank formatted diskettes. Use the first diskette for Steps 1 and 2 and the second diskette for Steps 3 through 5. |
- Insert a high-density floppy diskette in drive A and type:
FORMAT A: /S /U- Press Enter. The system displays a warning that the diskette will be formatted.
- Press Enter. The system prompts you to insert a diskette.
- Press Enter. The system formats the diskette. When the formatting is complete, the system asks if you would like to format another diskette.
- Type N.
- Copy the following files from the DOS directory to the floppy disk:
FORMAT.COM
FDISK.EXE
CHKDSK.EXE (or SCANDISK.EXE on DOS 6.x)
SYS.COM- Copy the following files from your F-PROT directory:
F-PROT.EXE

ENGLISH.TX0

FIXDISK.EXE

SIGN.DEF- When the system has finished copying the files, type:
FIXDISK RESCUE CREATE A:- Press Enter. The system saves a copy of the master boot record and boot sector to a rescue file, RESCUE.DAT, on drive A.
- Remove the diskette from drive A.
- Label this diskette "Command AntiVirus Rescue Diskette For (Users Computer ID)."
- Set the write-protect tab to prevent any modifications to the diskette.
 |
Because the rescue file on the diskette is machine-specific, this diskette is only for the computer used to create the file. |
Test your rescue disk by performing the following steps:
- Turn off your computer for about 15 seconds.
- Insert the Rescue Disk rescue disktesting in Drive A.
- Turn your computer on. After startup, the system notifies you that Command AntiVirus will scan your hard drive for viruses.
- Press Enter.
- When the scanning is complete, remove the diskette from drive A.
 |
NOTE: If you are using a Rescue Disk that you created manually, the system does not scan automatically. After system startup when the A: prompt appears, type: F-PROT /HARD /DISINF |
You have just created and tested a rescue boot disk. Put the diskette in a safe place until you get your next Command AntiVirus update. Hopefully, you will never have a need for it.
When you receive an update to Command AntiVirus, create a new rescue disk to insure that you have a stable boot disk with the latest recovery tools.
Do not panic. The following steps guide you through the disinfection process.
 |
If you think you have a virus that uses encryption, contact your local support representative. There are at least two types of encryption and two methods of disinfection. Your support representative will be able to help you use the proper method without any loss of data. |
- Exit all open applications, including Windows, and turn the system off for about 15 seconds. Do not restart using Ctrl+Alt+Del.
- Insert a virus-free write-protected system disk into drive A.
- Turn the system power on to restart from drive A.
- When the A: prompt appears, insert Command AntiVirus Disk #1 and type: F-PROT /HARD /DISINF
- Press Enter. The program scans all physical hard drives. When the virus is found, follow the instructions on the screen.
If the system reports an error in disinfection or an unknown variant, the correct action to take depends on what type of virus has been found. If the virus has been found in a file, contact your local technical support representative. If Command AntiVirus detects a boot sector virus, take the following steps:
- Have a blank, virus-free formatted diskette on hand.
- Exit all open applications, including Windows, and turn the system off for about 15 seconds.
- Insert a virus-free write-protected system disk into drive A.
- Turn your system power on to restart from drive A.
- When the A: prompt appears, insert Command AntiVirus Disk #1 and type: FIXDISK REPAIR C:
- Press Enter.
- When FIXDISK prompts you to enter a filename, remove Command AntiVirus Disk #1.
- Insert the blank, virus-free formatted floppy disk into drive A.
- Type an eight-character name (you can include a three character extension).
- Press Enter. The system copies the master boot record (MBR) of the hard drive into a data file on the floppy disk and attempts to rebuild the original MBR.
- After FIXDISK has completed rebuilding the original MBR, turn you computer off for 15 seconds.
- Replace the floppy disk with Command AntiVirus Disk #1.
- Turn your computer on. When the A: prompt appears, type:
F-PROT /HARD /DISINF- Press Enter. The program scans your hard drive for any other viruses.
- Remove the floppy disk and restart your computer normally.
If you believe that you have a new MBR or boot sector virus, contact your local support representative. This is an important step in preventing new viruses from spreading.
If your computer displays irregular behavior, check the CMOS setup for the following items:Make the necessary changes and complete the steps outlined in Unknown Variant. If these steps do not solve the problem, call your local technical support representative for further assistance.
- Boot sector protection (Boot Sector Virus Protection) should be turned off. Not all CMOS setups have this feature.
- The boot sequence should be A:, C:.
We have also included the file, SE_EICAR.EXE, on your distribution diskettes. When you run this file, a test file, EICAR.COM (from European Institute for Computer Anti-Virus Research), is extracted from it.
The purpose of the EICAR test file is to provide an industry standard solution to test anti-virus products. The EICAR test file is the result of a cooperative effort between various anti-virus researchers. You can use this test file to safely:
- Verify that your anti-virus protection is installed properly
- Verify that real-time protection is active
- Demonstrate what happens when a virus is found
- Test custom messages that you create
To test a manual scan you can either copy EICAR.COM to your hard drive and run a scan or you can leave EICAR.COM on a diskette and scan the diskette.
To test the real-time protection of either DVP or VIRSTOP, run or copy EICAR.COM.
If Command AntiVirus is installed properly and real-time protection is active, the system displays a message box indicating that the EICAR test virus has been found.
If the program is not installed properly or real-time protection is not active, the system displays the following message:
"EICAR-STANDARD-ANTIVIRUS-TEST-FILE!"