Command AntiVirus contains anti-virus programs for both the DOS and Windows environments. In DOS, you can start a virus scan by running the F-PROT.EXE file. If you run F-PROT.EXE by itself from the command line, a DOS-based menu appears. From within this menu, you can configure and run a manual virus scan.
If you run F-PROT.EXE with switches from the command line, no menu appears. Instead, the scan takes place immediately using the functions indicated by the switches.
This chapter contains information about running Command AntiVirus both from the DOS menu and from the command line.
The following directions will help you start a virus scan using the DOSbased menu. At the DOS command line:
- Type CD \F-PROT
- Press Enter.
- Type F-PROT
- Press Enter. The following screen appears, and F-PROT.EXE performs a scan for any viruses that may be in memory:
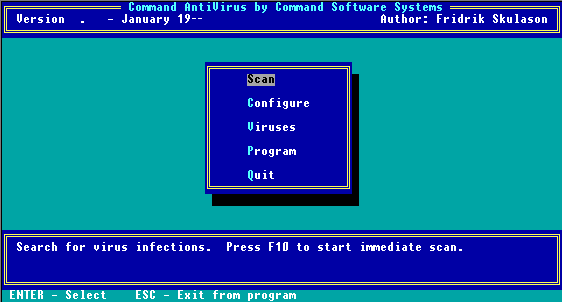
Main Menu
This first screen is the Main Menu screen for Command AntiVirus in DOS. You can select an item from the menu by using the arrow keys to move the highlighter bar to the appropriate command and pressing Enter.
 |
NOTE: When a menu item is highlighted, a description of the item appears in an information box at the bottom of the screen. From any screen, you can go back to the previous screen by pressing the ESC key. |
The following section describes these items in detail.
When you select Scan from the Main Menu, the following screen appears:
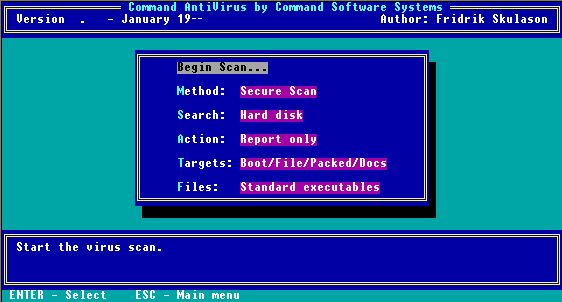
Scan Menu
From this menu, you can select the type of scan Command AntiVirus performs as well as which drives the program scans for viruses. For example, the program can scan on a local hard drive, diskette drive, or network drives. The following descriptions will help you decide which options to select.
When you select this option, the scan begins immediately. When the scan is complete, the system displays the following results box:

Scan Results Box
| |
NOTE: You can press Esc at any time to stop a scan in progress. |
When the scan is complete, the system also displays a Scan Results report. You can scroll through this report or send it to a printer or a disk file.
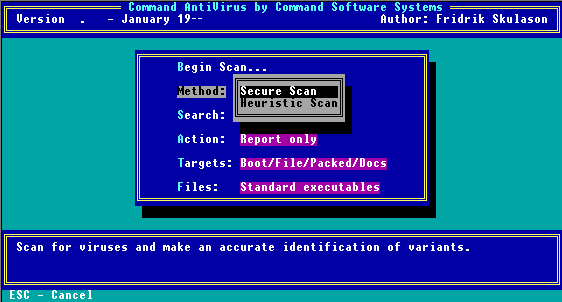
Method
When you select this option and press Enter, the following submenu appears:

Scan Method Menu
From this submenu you can select the scanning method. The program contains the following two types. Remember, the scan does not start until you select Begin Scan.
Secure Scan
This scanning method uses two different signatures when scanning for viruses. Secure Scan also reports the variant of the virus found and checks for Trojan Horses and polymorphic viruses. Secure Scan is our recommended scanning method.
Heuristic Scan
 |
This scanning method does not rely on specific virus signatures. Instead, Heuristic Scan uses behavioral patterns as well as a set of rules to identify the type of code that viruses use. Because Heuristic Scan can return false positives, we do not recommend this method for inexperienced users. |
Search
When you select this option, the following submenu appears:
Scan Search Menu
From this submenu, you can select which drives Command AntiVirus should search for viruses. You can select only one of the following search options at a time:
Hard Disk
This option searches your local hard drives. By default, the program searches all logical and physical drives automatically.
Diskette Drive
This option searches a diskette drive. If you have more than one diskette drive, a submenu appears. From this submenu you can select the diskette drive the program should search.
Network
This option searches all of your network drives.
User-specified
This option allows you to specify a particular drive/path to search. The User-specified option is particularly useful when you want to scan newly created directories after installing a new program.
ACTION
When you select this option, the following submenu appears:
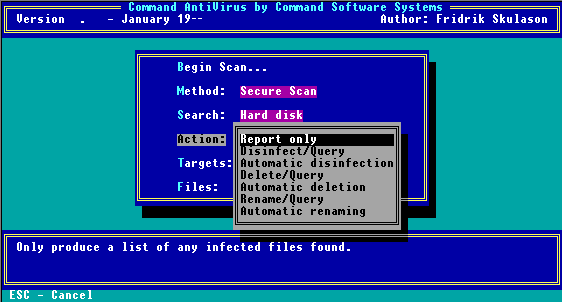
Scan Action Menu
| |
NOTE: From this submenu you can select the type of action to take when a virus is found. The default is Report Only. |
If you choose to disinfect a file, make sure you run Command AntiVirus after restarting the system from a virus-free write-protected system diskette. We recommend this rescanning process because, if a virus remains active in memory, the virus can interfere with the disinfection process.
The following descriptions will help you decide which option to select:
Report Only
This option displays the results in a report at the end of the scan. The program takes no other action.
Disinfect/Query
This option prompts you before disinfecting a file.
Automatic Disinfection
| |
This option disinfects a file automatically when Command AntiVirus finds a virus. Use Automatic Disinfection with caution as no prompt appears prior to disinfection. |
Also, some viruses cannot be disinfected. In these cases, the infected file is deleted automatically. No prompt appears prior to deletion.
Delete/Query
This option prompts you before deleting an infected file.
Automatic Deletion
| |
This option deletes infected files automatically. We do not recommend Automatic Deletion as some viruses encrypt portions of the hard disk. When the program removes the virus, the encrypted portions are lost. |
If you think you have a virus that uses encryption, contact your local support representative. There are at least two types of encryption and two methods of disinfection. Your support representative will be able to help you use the proper method without any loss of data.Be sure that you have a virus-free backup for all installed software and files before selecting this option.
Rename/Query
| |
NOTE: This option renames infected files so that their extensions begin with a V. For example, if a file named TRAVERS.EXE contains a virus, the program renames the file to TRAVERS.VXE. Because you cannot run files with a .VXE extension, these files are not a threat to your system. |
Before Command AntiVirus renames the suspected file, the program asks you if you want the file extension changed.Use this option if you want to study the infected file or compare it to a virus-free backup copy.
Automatic Renaming
This option is similar to Rename/Query, but the program does not prompt you prior to renaming the file's extension.
Targets
When you select this option, the following submenu appears:
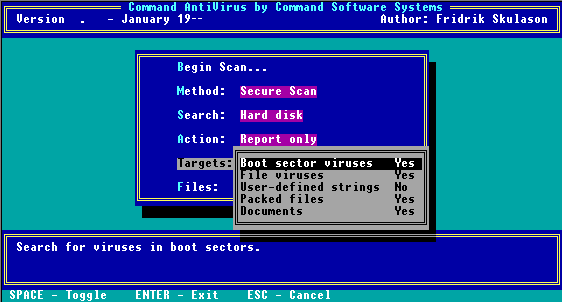
Scan Targets Menu
From this submenu, you can select the target Command AntiVirus searches for viruses. Selecting and pressing the space bar changes the option to either Yes or No. The following table will help you decide which targets to select. The default values are marked with a "*".
Target Selection
TYPES OF FILES DESRIPTIONS YES NO Boot Sector Viruses Searches for viruses in boot sectors * File Viruses Searches for viruses and Trojans in files * User-Defined Strings Searches for user-defined strings. Reduces scanning speed considerably. * Packed Files Scans LZEXE, PKLITE, EXEPACK, DIET and ICE packed files.
NOTE: PKZIP files are scanned using the command line switch /ARCHIVE.* Documents Scans inside Microsoft Word Documents.
CAUTION: Because F-PROT.EXE's scanning mechanism for macro viruses is limited, we do not recommend this selection for detecting macro viruses. Also, disinfection for macro viruses is not available because of memory constraints.
Use the Windows program or download F-MACRO from the Command Software Systems' BBS or FTP site. For more information about FMACRO, refer to FMACRO located later in this chapter. For information about running FPROT and FMACRO sequentially, refer to FP.EXE later in this chapter.*
Files
When you select this option, the following submenu appears:
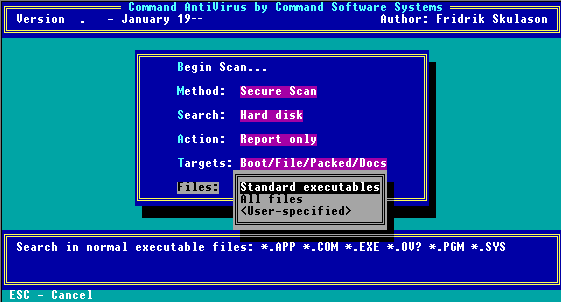
Scan Files Menu
The Files option allows you to select which files to search. The following descriptions will help you decide which options to select:
Standard Executables
This option searches files that end in .EXE, .COM, .APP, .OV?, .SYS, .PGM, and .BIN.
All Files
| |
This option searches every file. We do not recommend this option for inexperienced users as searching all files on a disk could produce a false indication of a virus. Use this option only if one of the following conditions exists: |
- A virus has been found on a system.
- You want to make sure a virus is not hiding in some obscure overlay file.
- You are concerned that a misnamed file may contain a virus that could later be activated by renaming and running the file.
User-Specified
This option allows you to specify a list of custom file name extensions to search. For example, the system defaults are EXE, COM, APP, OV?, SYS, PGM, and BIN. Move the highlight bar to an empty line and enter a three-character file name extension. DOS wildcards are acceptable. You can add up to three additional file extensions for a total of 10.
When you select Configure from the Main Menu, a submenu containing the following options appears:
Where available, this option allows you to select support for a different language. When you select this option, the system displays an information box that tells you which languages the program supports.
This option allows you to sort the virus information list by line or by column. When sorted by line, the viruses appear in alphabetical order from left-to-right. When sorted by column, the viruses appear in alphabetical order from top-to-bottom. Sort by line is the default. For example, refer to the Virus Information Screen on the following page.When you select this option, the system displays an information box that identifies how the program is sorting and asks if you want to change. Type Y or N.
When you select Viruses from the main menu, a submenu containing the following options appears:
This option allows you to learn more about a specific virus. For example, you can learn what type of damage a virus causes and how the virus spreads. When you select this option, the following screen appears:
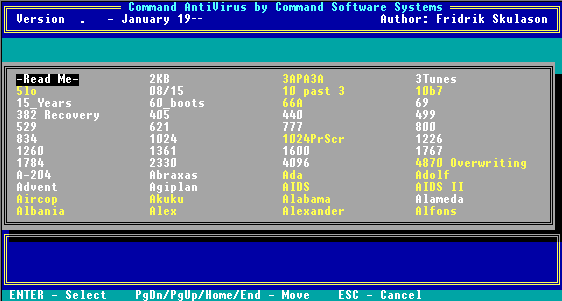
Virus Information Screen
The above list contains the names of all of the viruses in the virus signature database. You can scroll through this list by using the up and down arrow and the Page Up and Page Down keys. Virus names shown in yellow designate the root of a family of viruses. Virus names in white are variants.
You can obtain information about a specific virus by selecting the name of the virus and pressing Enter. You can also type the first few letters of the virus name and the system will take you to virus names beginning with the letters you typed.
This menu item allows you to make changes to your user-defined signatures. When you select this menu item the following submenu appears:
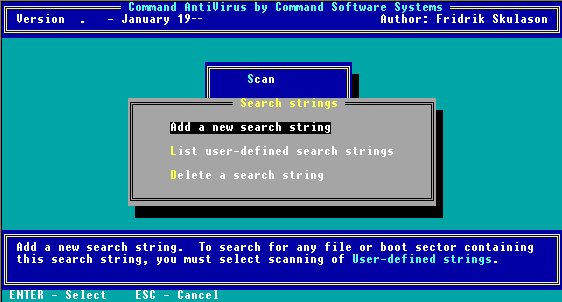
New Search Strings Menu
From this submenu you can select the following options. These options are useful when you have discovered a new virus and you have not had the opportunity to obtain a virus signature update.
This option allows you to add a new search string to your userdefined signatures. When you select this option, the program displays a series of information boxes that contain the following questions:
- What is the name of the virus?
- Does it infect .COM files?
- Does it infect .EXE files?
- Does it infect the boot sector?
- Search String: ?
You must provide a hexadecimal series of characters for the search string.
| |
NOTE: If you add a new search string, be sure to set the Targets option, "User-defined Strings," to Yes so that Command AntiVirus can use this information when performing a scan. For more information, refer to Targets located earlier in this chapter. |
This option displays a list of the search strings, if any, in your userdefined signatures.
This option allows you to delete a search string, if any, in your user-defined signatures.
This menu item provides information about Command AntiVirus. When you select Program from the Main Menu, the following submenu appears:
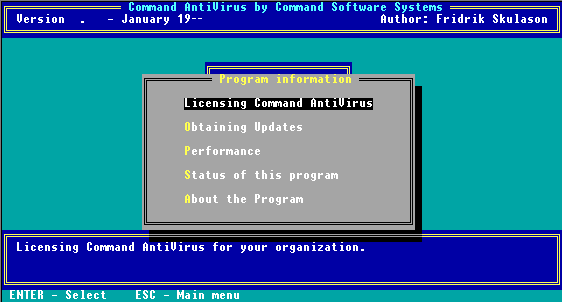
Program Menu
The following descriptions will help you decide which option to select:
This option provides information about site licenses, sales, and corporate contacts regarding Command AntiVirus.
This option provides addresses, telephone numbers, and other information about organizations that you can contact for updating your copy of Command AntiVirus.
This option provides basic information about the product's overall performance.
This option provides basic licensing information about your copy of Command AntiVirus.
This option provides information about the author and publisher of the program.
This menu item allows you to exit F-PROT.EXE. When you select Quit, the system asks you if you want to save the changes that you may have made to F-PROT.EXE's settings. Type Y or N.
The program stores the setup information in the file, SETUP.F2.
You can change the name of the default setup file, SETUP.F2. An environment variable allows different file names and multiple setup files. Use SET FPSETUP=DRIVE\PATH to specify the drive name and the configuration file's name. For example:SET FPSETUP=C:\SETUP.F2
SET FPSETUP=F:\NET.F2
 |
Please note that Command AntiVirus for Windows uses an extension of .FPW for the setup files and does not require an environment variable setting. |
Instead of using the DOS-based menu, you can also run the program in command-line mode. Command-line mode is useful, for example, if you want to start F-PROT.EXE from your AUTOEXEC.BAT file so that the program performs a full scan once each day. To use the command-line mode, you need to run F-PROT.EXE with at least one of the command-line switches shown in the following table. The order of the switches is not critical.COMMAND-LINE SWITCHES
SWITCHES DESCRIPTIONS /640 Scans only the first 640K of memory. Some video drivers require this. /ACCESS Prevents the last access date from changing on a Novell file server. This prevention maintains compatibility with archival software that relies on access dates. Command AntiVirus automatically skips compressed or migrated files. /ALL Searches all files, not just executable files. This approach may cause false positives and should be used with care. /ANALYZE Performs a heuristic analysis instead of a signature-based scan. This approach may cause false positives and should be used with care. /APPEND Appends a new report toswitchescommand-line an existing one. Use this switch with the /REPORT switch. /ARCHIVE Searches within .ZIP files. Note that you must have a path specified to the directory that contains PKUNZIP.EXE. /AUTO Use with the /DELETE or /DISINF switch so that Command AntiVirus will not prompt you before deleting or disinfecting a file. When used without /AUTO, /DELETE and /DISINF prompt you before taking any action. /BEEP Sounds an alarm when the program finds a virus. /BOOT [default] Scans for MBR and boot sector viruses. /DELETE Deletes all infected files instead of listing them. We do not recommend this switch as some viruses encrypt portions of the drive. /DISINF Disinfects whenever possible. This option does delete some first-generation virus samples. A first-generation virus is the "starter" program that begins the infection process. Encountering one is very rare. This option never deletes a file that the program can disinfect. /EXT= Specifies additional file name extensions to scan. Separate each file name extension with a period (.).
For example: /EXT=EXE.COM.PRG.DBL/FILE [default] Scans for file viruses in executable files. /FREEZE Halts the computer when the program finds a virus. /HARD Scans all the physical hard drives in the system. /HELP or /? Displays a list of available options. /INTER Forces interactive mode. /LIST Produces a list of all files checked, not just infected files. /MONO Forces monochrome screen mode. /MULTI Prompts for multiple diskettesswitchescommand-line to scan. /NET Scans all network drives. Refer to Restricting Users in the Network Administration chapter. /NOBOOT Does not scan for MBR and boot sector viruses. /NOBREAK Does not allow users to end a scan with the Esc key. Refer to Restricting Users in the Network Administration chapter. /NODOC Does not scan document files. /NOFILE Does not scan for file viruses. /NOMEM Does not scan memory. /NOPACKED Does not search inside packed files. /NOSUB Does not scan subdirectories. /NOUSER [default] Does not search for user-defined virus patterns. /NOWRAP Does not wrap text in reports. /OLD Does not display out-of-date messages. /PACKED [default] Scans inside packed files. /PAGE Pauses after every screen while displaying a report. /RENAME Renames infected files. You may use this switch with /AUTO. /REPORT= Sends the output to the specified file. /SILENT Generates no screen output at all. This switch is useful when running the program from a batch file where you will check for the return codes. /TODAY Stores the date of the last scan in an F-PROT.DAT file. If the next scan finds the same date, F-PROT does not repeat the scan. /USER Searches for user-defined virus patterns. This switch should only be used if absolutely necessary, as the /USER switch can result in a considerable speed decrease.
To perform a daily full scan before logging onto a network or loading any TSR programs, place the following command line at the beginning of your AUTOEXEC.BAT file.C:\F-PROT\F-PROT /HARD /FREEZE /TODAY
The /HARD switch tells the program to scan all physical hard drives.
The /BOOT switch tells the program to scan the boot sectors and MBRs.
The /FREEZE switch tells the system to lockup if the program finds a virus. At this point, you should turn the machine off and refer to If A Virus Is Found in the Installation chapter.
The /TODAY switch compares a small data file in the root directory with the current date. If they match, the program takes no action. If they do not match, the program performs a full scan and writes the current date to the data file.
 |
A network administrator may want to call F-PROT.EXE from a server. In this case, you must use the SET command to store the F-PROT.DAT file on the user's local hard drive. For more information, refer to the Network Administration chapter. |
Should you choose to run F-PROT.EXE from a network rather than the local drive, substitute the network path.
F-PROT.EXE returns the following codes that you can check with the ERRORLEVEL command from a batch file. Use this command in your AUTOEXEC.BAT file to warn you if Command AntiVirus finds a problem.
For example, if the program returns the numeral 2 to the operating system, you could notify the user that Command AntiVirus failed its self-test and then request that the user either notify a supervisor or take corrective action.
F-PROT.EXE RETURN CODES
RETURN CODES DESRIPTIONS 0 Normal exit. No viruses were found. 1 Abnormal termination-unrecoverable error. This is often the result of a missing system file. 2 Self-test failed. Command AntiVirus has been modified. 3 A Boot/File virus infection has been found. 4 Virus signatures found in memory. 5 Program terminated with ESC. 6 At least one virus was removed. This code is meaningful only when used to scan a single file. 7 Insufficient memory. Additional available RAM is required. 8 Invalid program files. This usually indicates corrupt files. 90 A macro virus has been found. This return code can combine with the other codes. For example, a "93" return code indicates that a Boot/File virus infection was found as well as a macro virus.