

This chapter contains information on running Command AntiVirus in Windows. For example, Command AntiVirus In Windows contains details on scanning options, toolbar controls, scan results, and Dynamic Virus Protection (DVP).The following directions will help you start a virus scan using the Windows graphical user interface (GUI). At the Program Manager window:
- Double-click on the Command AntiVirus group icon. The system displays the Command AntiVirus window.
- Double-click on the Command AntiVirus icon. The system displays the following Scan Options View:
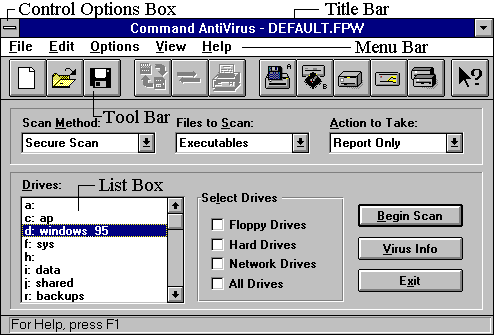
Scan Options View
You can select a command by clicking on the command button with your mouse. For example, in the Scan Options View, the large button in the lower-right corner labeled Begin Scan starts the scanning process.
After each scan, the system displays the following Scan ResultsView:
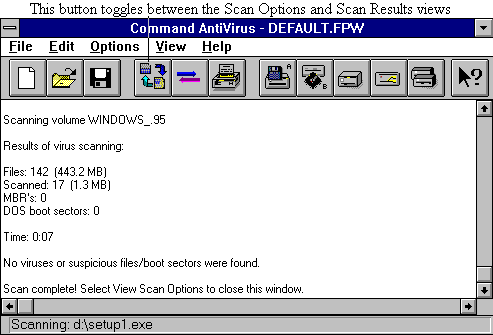
Scan Results View
You can switch between the Scan Results View and the Scan Options View by Double-clicking in the active view.
The following Scan Options View is the control center for Command AntiVirus in Windows. From this view, you can initiate scans and configure the various scanning options.

Scan Options View
Before selecting Begin Scan, you can specify how you want your scan to operate. Using the default settings, the program scans your hard drive with the Secure Scan method to check executable files and generates a report.
 |
You can use the User-Defined Scan button on the toolbar to specify a particular memory or reporting configuration that you have previously saved as CUSTOM.FPW. Clicking on this button immediately starts a scan. |
For more information about creating and saving configuration files, refer to File Menu located later in this chapter.
 |
You can use the Default Settings button on the toolbar to restore the scan options to the default settings. |
 |
NOTE: Automatic disinfection of files is not a default setting for Command AntiVirus. |
This list box provides a list of drives the program can scan. You can select multiple drives, including individual mapped drives and floppy drives. The program will scan the selected drives in the order listed.
 |
NOTE: The program will not scan drives that are not selected. If you want to scan all drives, you can select the All Drives option under Select Drives. |
Select Drives contains four check boxes for selecting the drive the program scans. Select or clear one or more of the items listed. When you select a type, the program scans all drives of that type.
This option selects both drive A and drive B for scanning. If you want to scan only one floppy drive, use the Drives list box to select the floppy drive you want to scan.Scan the A: Drive and Scan the B: Drive buttons on the toolbar.
 |
The Scan the A: Drive button scans the diskette in drive A. This button uses the FLOPPY_A.FPW configuration file. |
 |
The Scan the B: Drive button scans the diskette in drive B. This button uses the FLOPPY_B.FPW configuration file. |
This option searches your local hard drives. Command AntiVirus searches all local drives by default.
 |
You can also use the Scan the Hard Drives button on the toolbar to search your local hard drives. This button uses the DEFAULT.FPW configuration file. Command AntiVirus searches all logical drives by default. |
This option searches all network drives that are attached at this time. Network drives are listed by their mapped names.
 |
You can also use the Scan the Network Drives button on the toolbar to search all of your network drives. This button uses the NETWORK.FPW configuration file. |
This option specifies all attached drives on your system including RAM and CD-ROM drives.
When you click on the arrow button, the system displays a drop-down list box. From this list box you can select the type of scanning to perform. The following descriptions will help you decide which option to select. Remember, the scan does not start until you select Begin Scan.
This scanning method uses two different signatures when scanning for viruses. Secure Scan also reports the variant of the virus found and checks for Trojan Horses and polymorphic viruses. Secure Scan is our recommended scanning method.
 |
This scanning method does not rely on specific virus signatures. Heuristic Scan uses behavioral patterns as well as a set of rules to identify the type of code that viruses use. Because Heuristic Scan can return false positives, we do not recommend this method for inexperienced users. |
When you click on the arrow button, the system displays a drop-down list box. From this list box you can select the type of files to scan. The following descriptions will help you decide which option to select.
This option searches files that end in .APP, .COM, .DO?, .EXE, .OV?, .PGM, .SYS, and XLS. By selecting this option, the program checks only the executables and command files where viruses are found. You can add up to 12 additional file extensions (for a total of 20) by selecting Files to Include/Exclude from the Options menu. For more information, refer to Options Menu located later in this chapter.
 |
This option searches every file. We do not recommend this option for inexperienced users as searching all files on a disk could produce a false indication of a virus. Use this option only if one of the following conditions exists: |
- A virus has been found on a system.
- You want to make sure a copy is not hiding in some obscure overlay file.
- You are concerned that an improperly named file may contain a virus that could later be activated by renaming and running the file.
When you click on the arrow button, the system displays a drop-down list box. From this list box you can select the type of action to take when the program finds a virus. The following descriptions will help you decide which option to select.
This option displays the results in a report box at the end of the scan. The program takes no other action.
This option prompts you before disinfecting a file.
 |
This option disinfects a file automatically when Command AntiVirus finds a virus. Use Automatic Disinfect with caution as no prompt appears prior to disinfection. |
Also, some viruses cannot be disinfected. In these cases, the infected file is deleted automatically. No prompt appears prior to deletion.
This option prompts you before deleting an infected file.
 |
This option deletes infected files automatically. We do not recommend Automatic Deletion as some viruses encrypt portions of the hard disk. When the program removes the virus, the encrypted portions are lost. |
Be sure that you have virus-free backups for all installed software and files before choosing this option.
 |
This option renames infected files so that their extensions begin with a V. For example, if a file named TRAVERS.EXE contains a virus, the program renames the file to TRAVERS.VXE. Because you cannot run files with a .VXE extension, these files are not a threat to your system. |
Before Command AntiVirus renames the suspected file, the program asks you if you want the file extension changed.
Use this option if you want to study the infected file or compare it to a virus-free backup copy.
This option is similar to Rename/Query, but the program does not prompt you prior to the renaming of the file's extension.
The menu bar contains the File, Edit, Options, View, and Help selections. When you click on a selection, the system displays a drop-down menu. The following is an example of the File menu:
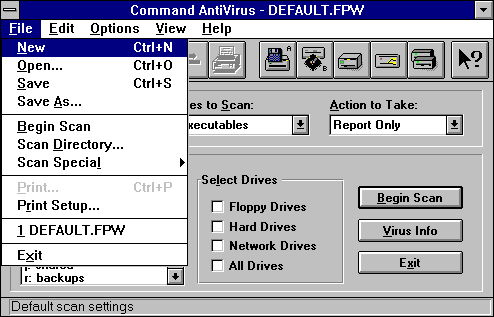
File Menu
The following section describes these selections in detail.
The FILE drop-down menu items allow you to create, open and save specific scanning configurations that you want to reuse in the future. These configuration files have an extension of .FPW.
Command AntiVirus uses the configuration file, DEFAULT.FPW, which contains the default scan parameters. If you want to modify the DEFAULT.FPW, choose your scanning options and select Save from the File menu.
You can create a configuration file by selecting New from the File menu. The system displays the Untitled dialog box which contains the default scanning configuration. Select your scanning options and select Save As from the File menu to save the configuration to a file name of your choice.
The following section describes the File menu items in detail:
This menu item displays the Untitled dialog box which contains the default scanning configuration. The Untitled dialog box allows you to select scanning options that you would like to save to a configuration file.
This menu item displays the File Open dialog box which allows you to select a configuration that you have saved.
 |
You can also use the Load Settings button on the toolbar to load a configuration that you have saved. |
This menu item allows you to save changes to an existing configuration file as well as a current configuration to a new file. If you select this item to save a new file, the system displays the following File Save As dialog box:
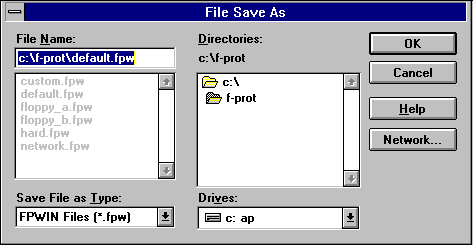
File Save As Dialog Box
This dialog box allows you to save your current scanning configuration to a file name of your choice. If you select Save after you have given your configuration a name, the program saves the file without displaying the File Save As dialog box.
 |
You can also use the Save Settings button on the toolbar to save your current configuration. |
This menu item displays the File Save As dialog box which allows you to save a scanning configuration to a file name of your choice or to change the name and/or path of your current scanning configuration.
This option begins a scan. Click on Cancel or press Esc at anytime to end a scan in progress.
This menu item displays the following dialog box that allows you to select which directory the program should scan for viruses. You can even select a single file to scan. Press Esc at anytime to end a scan.
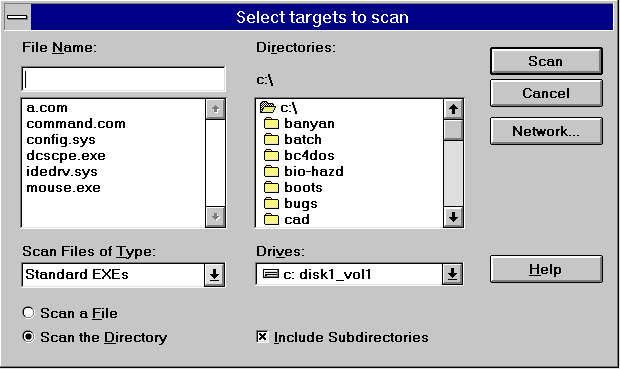
Select Targets to Scan Dialog Box
This menu item displays a sub-menu that allows you to select a standard configuration for one of the following choices:
- Drive A
- Drive B
- Hard Drives
- Network
- Custom
This menu item displays a dialog box that allows you to print the results of your scan with the following options:
All
This option prints all of the information gathered in the last scan.
Pages
This option prints selected pages (From & To)
Copies
This option allows you to select the number of copies to print.
 |
You can also use the Print Reports button on the toolbar to print the current report. |
 |
NOTE: You must be in the Scan Results View to use the Print option and the Print Reports button. |
This menu item displays a standard Print Setup dialog box which allows you to select the printer, orientation, and paper size and source.
This menu item displays the path and file name of the last four configuration files you used. When you select one, the program loads that configuration file.
This menu item exits the program. The system asks you if you want to save any changes.
After a scan, the following EDIT drop-down menu items allow you to copy or clear the scan results:
This item copies the Scan Results View to the Windows clipboard so that you can transfer the results to another program.
 |
You can also use the Copy Report button on the toolbar to copy the Scan Results View to the clipboard. |
This item erases the contents of the Scan Results View.