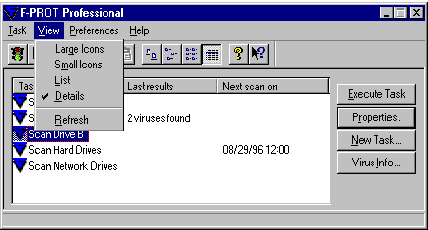
View Menu
This is a standard Windows 95 menu that allows you to change the way you view the tasks shown in the task list. The available options are described briefly. Further information is available in your Windows 95 manual.
View Menu
 |
The tasks are displayed in the task list as large icons with the name under each icon.
In addition to choosing the Large Icons item from the View menu, you can also access this item by selecting this button from the toolbar. |
 |
The tasks are displayed in the task list as several columns of small icons with the task name alongside each icon.
As an alternative to using the Small Icons item in the View menu, you can access that item by selecting this button from the toolbar. |
 |
The tasks are displayed in the task list as a single column of small icons with the task name alongside each icon.
In addition to using the List item on the View menu, you can also access it by selecting this List button from the toolbar. |
 |
The tasks are displayed in the task list as a single column of small icons with the name alongside each icon and a column for the results of the last scan and the time of the next scheduled scan.
Selecting this Details button from the toolbar will displays the task list as small icons with scan result and scheduled scan information next to it. The Details item can also be accessed by choosing it directly from the View menu. |
Selecting the Refresh item updates the task window to reflect the FPT (F-PROT Task) files on the disk.
The Preferences menu is one of the key areas for cutomizing F-PROT. You may access this menu either by highlighting and clicking on the menu title or by pressing ALT + P. Each menu option will be explained in the following pages.
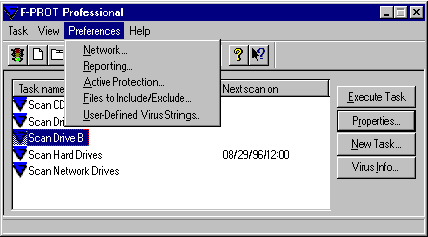
Preference Menu
Through the Network menu item you are able to set up messaging via your e-mail system and modify interaction with NetWare if you are running FPROT Professional for NetWare.The Reporting selection allows you to decide on available options for virus notification.
Active Protection opens a dialog box where you can enable/disable and configure Real-time protection for both DOS and Windows sessions. Additionally, you can select which areas of memory are scanned for viruses when the operating system is loaded.
There is also a menu command for Files to Include/Excluding files which can be very helpful for specific scans.
Should you ever need to add a User-Defined Virus String, the string can be added from the Preferences Menu.
The Network options allow you to set up messaging to your network. If you are running NetWare, there is a special section for configuring scan options, which is designed to work with F-PROT Professional for NetWare (FPN).
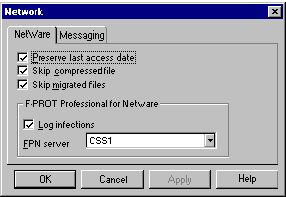
Network Menu
When the NetWare tab is selected, a dialog box will open which allows you to configure the following items.
Preserve last access date
Checking this box will prevent modification of the access date on the file. Many backup systems reference the last backup date.
Skip compressed files
Compressed files are files that have not been accessed for a period of time, perhaps weeks or months. If the file was compressed after an initial scan with F-PROT Professioanl, it is unlikely that it contained a virus. You can shorten scan times by checking this box. We advise that you check compressed files once when F-PROT Professional is first installed and then again with every major update of the product.
Skip migrated files
As migrated files are not in use (by definition), you can shorten scan times by checking this box. Migrated files should be checked once when F-PROT is first installed and again before using them.
Log infection
If you are running F-PROT Professional for NetWare(FPN), you can select this box. FPN maintains a log file on each server. From within this box, choose a valid server name from the drop-down list box. Afterward, if a virus is discovered, it will be added to that servers F-PROT log file. Use a text editor ot the View option to view the log.
The Messaging menu allows you to modify the message shown to network users when a virus is encountered.
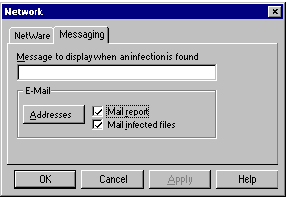
Messaging Menu
Message to display
You can enter a text message of your choice up to 80 characters in length. This is very useful for Network administrators and may include phone numbers or other helpful messages.
This area controls notification using your existing e-mail system.
Addresses
Choose Addresses to select who will receive the messages.
Mail report
Check this box to have a virus report mailed to the address selected in Addresses.
Mail infected files
Check this box to have the infected file mailed to the address selected in Addresses.
The Reporting screen controls how the scan results display for report purposes and allow you to choose whether or not to have an audible warning.
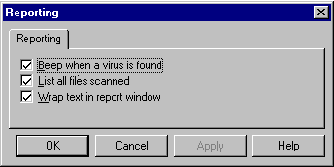
Reporting Menu
The PC speaker will emit a short beep when a virus is found, during any scan, if this item is selected.
You may wish to avoid lengthy reports by not selecting this box. However, this provides the ability to verify that the appropriate files are being scanned.
It may be easier to read short reports if you select Wrap text in report window. In longer reports, you may find it easier to find individual file listings without wrapping the text.
Real-time virus protection for Windows 95 (DVP) and DOS are configured in this section.
This dialog box allows modification of the Dynamic Virus Protection (DVP) program. DVP provides real-time protection against viruses by scanning the boot sector every time a floppy is read and scanning every program file prior to execution.
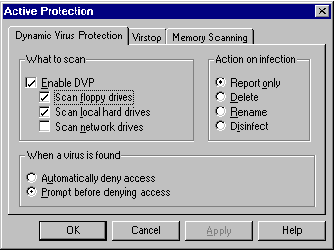
Active Protection Menu
Enable DVP
This box must be checked for active virus protection. You can choose to scan floppy drives, local hard drives and/or network drives.
What to scan
You may allow DVP to be active and decide what drives it should scan by selecting any of the choices listed.
Action on infection
You may select any one of the options listed below.
Report only
This will inform you when a virus is detected but no other action will be taken. You may choose the report only option in order to verify the type of virus before disinfection.
Delete
 |
This automatically deletes virus-infected files.
While this is a powerful option, the potential exists for loss of data. Some rare viruses perform encryption on the hard drive that can make file recovery difficult. |
Rename
This automatically renames virus-infected files. It changes the file name extensions to a none-executable form.
Disinfect
This automatically disinfects virus-infected files. Please note the caution for Delete.
Remove all macros is a variant is found
If this option is selected, all macros are removed from any file containing a new or modified variant of a macro virus. If this option is not selected and the Action to Take is Disinfect or Disinfect/Query, files containing remnants or are variants of macro infections are renamed.This is available only when the Action to Take is Disinfect or Disinfect/Query.
When a virus is found
These options specify what will happen when a virus is found.
Prompt before denying access
|
When this option is enabled, an attempt tto access an infected file results in a dialog box asking the user whether the attempt should continue.
If Prompt Before Denying Access is selected, executing or accessing the infected could result in the further spread of the virus. |
Automatically denying access
Automatically denying access will not allow an infection to spread.
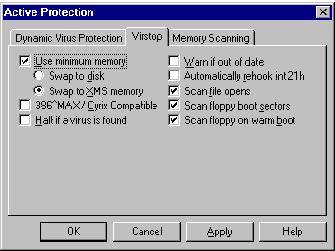
Virstop provides real-time protection when you boot to MS-DOS mode (not in an MS-DOS window) and can be configured in this menu.
Virstop Menu
Use minimum memory
This forces Virstop to swap the temporary virus signature file (approximately 30K) to the disk or to XMS memory, depending on which option you select.
386^Max/Cyrix compatible
If you are using 386^MAX memory management or a Cyrix microprocessor, check this box.
Halt if a virus is found
Selecting this box will cause the system to lock up when a virus is found. This is intended to force a user to disinfect before continuing.
Warn if out of date
This notifies the user that the virus signature files are out-of-date and should be updated for continued protection against newer viruses.
Automatically rehook int21h
 |
When Virstop is loaded, it hooks int21h. If this occurs before logging on to a network, the network driver may take over this connection. If you check this box, Virstop will automatically rehook in order to continue protection. |
Scan file opens
Selecting this box will cause Virstop to scan every executable file that is opened.
Scan floppy boot sectors
Checking this box will cause Virstop to scan the boot sector of a floppy every time it is accessed.
Scan floppy on a warm boot
When this option is selected, pressing Ctrl+Alt+Del causes Virstop to scan the boot sector of any floppy in drive A: prior to reloading the system.
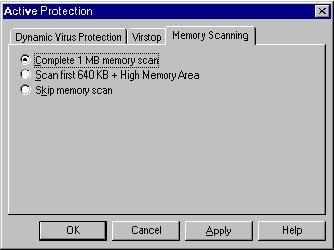
We recommend scanning memory whenever you boot your system. Some systems have video problems when Upper Memory Blocks or High Memory is scanned, so we provide various scan options. Memory scanning can also be disabled entirely, but this is not recommended.
Memory Scanning Menu
Complete 1MB memory scan + High Memory Area
Choosing this option provides the most comprehensive memory scan and includes the first 64 KB above 1 MB. Some viruses take advantage of this area and, if you scan only the first 640 KB or 1 MB, you run the risk of infection. F-PROT Professional has this option selected by default. If you experience lock-ups, try the Complete 1MB memeory scan option.
Complete 1MB memory scan
Choosing this provides a thorough scan of the first 1MB of memory, which includes the vieo area above 640KB. If you experience lockups, use the 640K + High Memory option.
Scan first 640k + High Memory Area
Scan conventional memory plus the High Memory Area, which is the first 64KB above 1MB. This avoids scanning areas which may have conflicts with some high-resolution video drivers, and some Micro Channel network cards.
Scan first 640KB
This option scans only convention memory.
Skip Memory Scan
|
This is the fastest way to boot. Remember, this could allow a virus to remain active in memory if you have disabled some of the other detection features. |
These two screens allow you to enter and delete file extensions to be scanned (included) or not scanned (excluded). Extensions entered here apply to all scan tasks.
If you want to add a specific type to your scans, type that file's three-letter extension in the New Extension text field and select Add. To remove a particular file type from your scans, locate its three-letter extension in the Filename extensions list box. Then, highlight the extension you want to remove and select on Delete.
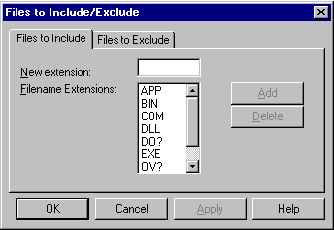
File Extensions Menu
To exclude a specific file from a scan, use the Browse button to locate the file or you can type the file's full name and extension in the New exclusion text field. Then choose Add. To remove a file, highlight it in the Filenmes list box and select Delete.
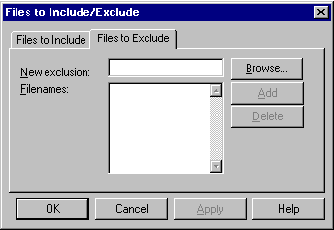
Files to Exclude Menu
The exclusion ability is helpful when you want to scan files that have the same extension but you wish to exclude one or more specific files that use that same extension.
 |
Wildcards are not accepted. If only an extension is entered in the New Exclusion text field and that extension is also in the Files to Include list, then files of type will be scanned. To prevent all files of a specific type (all .DOC files for example) from being scanned, you must remove that extension from the Files to Include list. |
This dialog box allows you to add, change or delete specific search strings that will be part of the search criteria during scan.
| |
This option is useful when a new virus warning is posted and you have not yet had time to obtain a virus signature update. Should you ever need to use a User-Defined search string, be sure you have a check in the User-Defined virus strings check box, located in the Properties window. |

User-Defined Virus Strings Menu
The example shown above demonstrates how this capability could be used to detect a macro virus.
General help for F-PROT Professional for Windows 95 can be found on this menu.
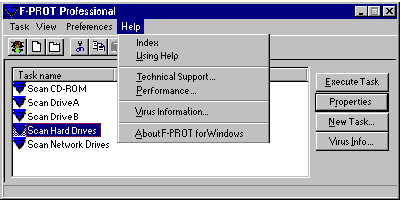
Help Menu
The Index is a handy cross-reference tool for help information.
This gives basic instructions for effectively using the help system.
This provides phone numbers and electronic methods to obtain technical support.
This provides information regarding the number or viruses detected by F-PROT for Windows 95.
The Virus Information screen provides detailed information on several hundred common virus families and variants.
 |
The version number and copyright information can be found by selecting this toolbar button. That information is also located in the Help menu. |