
FPWCFG.EXE Opening Dialog box
This chapter will cover network administration techniques for installation, updates and operation of F-PROT Professional. These techniques can be combined to support local workstations as well as off-site users.For first time installations F-PROT Professional can be placed on the server and users can install to their local hard drive. This can be done as an interactive procedure as described in the Installing from the Server section. F-PROT Professional can also be installed automatically as described in the Automatic Installation and Update section.
There are always new viruses surfacing. To provide system protection against new viruses, Command Software Systems provides six to twelve updates of F-PROT Professional per year. The actual diskettes are shipped on a quarterly basis and interim releases are available via our FTP or BBS sites. When you download F-PROT Professional electronically, you will receive a single, large, executable file. Place this file in a temporary directory and execute it. It is a self-extracting ZIP file.
Upgrading F-PROT Professional can be easily accomplished by using a utility available with the full product and also from our BBS and FTP. This use of this utility is described in the section called Automatic Installation and Update. You may also simply reinstall F-PROT Professional when you receive an update.
This chapter will also cover some of the tools available to the administrator, such as:
This method allows each workstation to manually install F-PROT Professional without using installation diskettes.There are two batch files used for simplifying the server-level distribution process. NETDISK.BAT and ONEDISK.BAT both provide an "installation" directory on the server. You would choose NETDISK.BAT if you are working from the installation diskette set you have received from Command Software. You would choose ONEDISK.BAT if you have downloaded the F95-XXXC.EXE (where XXX indicates the version) file from our BBS or FTP site.
NETDISK.BAT is supplied on the F-PROT distribution diskettes and requires the administrator to create a shared F-PROT Professional directory on the server. The important thing to note here is that it is run from the server and it installs the required files from the installation diskettes.
NETDISK A:[ENTER]
When the batch file finishes, users with access to the directory you created can run INSTALL from DOS or SETUP from Windows and perform a standard installation on their local drive.
Alternately, ONEDISK.BAT is part of the download version of F-PROT Professional and is found in the self extracting file F95-XXXC.EXE
ONEDISK F:\PUBLIC\F-PROT [ENTER]
After completion, users can run SETUP from Windows to perform a standard installation on their local drive.
F-PROT Professional for Windows 95 comes with a utility called SE_UTIL. SE_UTIL provides system administrators with the ability to quickly deploy and update F-PROT Professional on multiple workstations in a multiplatform environment.SE_UTIL operates by placing F-PROT Professional update files on a network server. When workstations log on to the network, they check the version of the F-PROT Professional files located on the server. If the version number is newer, the server responds by automatically updating the workstations with the newer F-PROT Professional files.
Detailed information regarding the installation and usage of SE_UTIL can be found in the file called SE_UTIL.DOC. Locate the file called SE_UTIL.EXE on one of the F-PROT Professional installation diskettes. Place that file in a directory by itself and execute it. Several files will be extracted, one of which will be SE_UTIL.DOC.
If you download F-PROT Professional from our FTP, BBS or WWW site, create a set of installation diskettes from the file you downloaded and use the procedure described above to locate and view SE_UTIL.DOC.
FPWCFG.EXE is a utility which permits Administrators to control some of the key functions of F-PROT Professional for Windows 95. FPWCFG.EXE allows the administrator to prevent a user from turning off the real-time protection provided by DVP, restrict a user from scanning network drives and disable a users ability to disinfect a virus.
If you have received F-PROT Professional for Windows 95 on diskette, the FPWCFG.EXE file can be located on the 2nd installation disk. If you have downloaded a copy of F-PROT Professional for Windows 95, the FPWCFG.EXE file will be in the download directory after you have unzipped all files. Keep in mind, however, FPWCFG.EXE will never be installed as part of the setup routine.
FPWCFG.EXE can be used by system administrators after installation, to modify the F-PROT Professional for Windows 95 executable file, FPROT32.EXE. You may use it to modify F-PROT32.EXE as many times as necessary. If you will be implementing any of the control features offered by FPWCFG.EXE, do not provide a copy of FPWCFG.EXE to your users.
If you distribute F-PROT Professional for Windows 95 on diskette, you will discover how easy it is to create a new substitute for disk #2 using our installation program. Before beginning this process have a clean formatted diskette ready.Install F-PROT Professional to a local workstation using the diskettes you received. However, when you run SETUP add the word ADMIN. For example, from Start/Run type: A:Setup Admin
The installation will proceed as normal. When prompted, you will be able to modify F-PROT (for details see the following section Configuring F-PROT), and a new disk #2 will automatically be created, with your configuration. The new disk can then be substituted for the one we shipped, but it will not contain FPWCFG.EXE.
If you have downloaded F-PROT Professional for Windows 95, and have the files inflated in a directory on a hard drive (which would be the case if you used our ONEDISK batch file), we provide a similar method whereby the files needed for setup are saved with your modifications. The sequence to accomplish this is as follows.First create a unique directory to download your copy of F-PROT Professional for Windows 95. For demonstration purposes we will name the directory FPWTEST, and we will assume the F-PROT Professional program was downloaded to C: drive. Execute or unzip the file so its contents are extracted.
Next, select Start/Run from Windows 95. In the Run line type:
The ONEDISK batch file will run, and a setup file located on C: drive will be created for F-PROT Professional in the FPWTEST directory.C:\FPWTEST\ONEDISK.BAT C:\FPWTESTFrom Start/Run enter the following:
Setup will begin as usual. The easiest way to continue is to select the default settings. When prompted, you will be able to modify F-PROT Professional (for details see Configuring F-PROT). Configure F-PROT Professional and then save. After saving, the file FP95.CSS will include your changes. In the scenario presented above, the contents of the FPWTEST directory could then be copied to a network drive where users could run Setup.C:\FPWTEST\SETUP ADMINWhen setup is run by the user, a modified version of F-PROT, reflecting your changes, will be installed.
FPWCFG.EXE Opening Dialog box
Before attempting to make any changes to F-PROT32.EXE, be sure to close F-PROT Professional.To begin making your changes, either copy FPWCFG.EXE to the hard drive or run it from the diskette. One way to execute the FPWCFG file is to find it from Explorer and double-click. When FPWCFG.EXE is run, the dialog box above will display. The browse button allows you to locate F-PROT32. EXE, which is the file you need to modify. Once the path to F-PROT32.EXE is displayed in the configure box, you may modify the "User name" and the "Organization" field or choose "Options".
While it is not necessary to do so, Administrators may use the "User name" and "Organization" fields to indicate that F-PROT has been modified to their specifications. Simply type name and organization in the available text area. The entries will then become part of the F-PROT32.EXE file. Thereafter, any time FPWCFG.EXE is executed, the information will display. Any alpha numeric entry will be accepted, so if you prefer to enter a date or other reference in these fields you may do so.
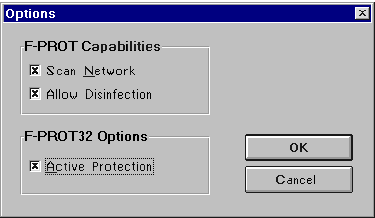
When you select "Options" the "Options" dialog box will open. When we ship F-PROT Professional all options are enabled. Therefore, the first time you view the F-PROT32.EXE file, all items are shown as selected, i.e. with an "X" in the checkbox. Configure F-PROT Professional to your needs and choose "OK". After choosing "OK" you are returned to the "F-PROT Config" dialog box. To finalize your changes, select "Save". The dialog box will close and you will now have a customized configuration for F-PROT Professional for Windows 95.
FPWCFG Configuration Options
To prevent users from scanning network drives, the "Scan Network" checkbox should be cleared. This will eliminate unnecessary network traffic. If a user has an existing scan task for scanning network drives, then that task will no longer execute. In the report window a message will display which says "This version is unable to scan network drives." Additionally, if a new task is created, the checkbox for "Select all network drives" in the "Properties" dialog box, is grayed out.The "Allow Disinfection" checkbox may be cleared if you prefer to monitor and perform all disinfection yourself. When you configure F-PROT32.EXE so that disinfection may not be performed, the "Action to take" drop down list box will be grayed out and will have "Report only" status. Existing scans will no longer be able to disinfect, and new scan tasks will not have a choice.
The "Active Protection" menu item, located under the "Preferences" menu, allows you to configure the real-time protection which is provided by DVP (the Dynamic Device Driver), Virstop, and Memory Scanning. With DVP active an Administrator can rest assured that diskettes, CD ROMS and other new files introduced to the workstation/network environment, are scanned for viruses. DVP provides an important layer of protection against viruses. If a user disables DVP, however, that layer of protection is lost. For this reason, many Administrators do not want the users to have this ability. By clearing the checkbox for "Active Protection", the user will be unable to access the "Active Protection" menu item.
The following batch files provide options that will simplify the administrator's distribution tasks.
The 3DISK.BAT file is used after receiving an update electronically to create a set of high-density (1.44Mb) installation diskettes. The syntax is easy. Simply type:You will be prompted to insert a formatted, high density diskette into the drive you've indicated.3DISK A: (OR B:) [ENTER]
There is a self-extracting file provided on the distribution diskettes called SE_EICAR.EXE which contains a file called EICAR.COM. The purpose of the EICAR (European Institute for Anti-Virus Research) test file is to provide an industry standard solution to test anti-virus products. The EICAR test file is the result of a cooperative effort between various anti-virus researchers. You may use this file in a variety of ways. For example, you can safely verify real-time protection is active and demonstrate what happens when a virus is found.