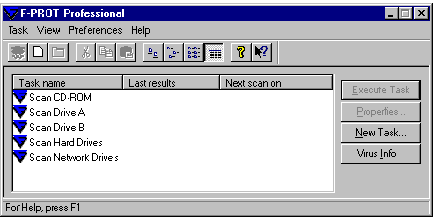
Main View
F-PROT Professional for Windows 95 provides a truly powerful scan for viruses in an easy and intuitive way. One of the benefits of Windows 95 is the ability to accomplish tasks in the manner most comfortable to you: FPROT Professional for Windows 95 takes advantage of this capability.

Main View
F-PROT Professional for Windows 95 takes advantage of the user-friendliness in Windows 95. Task orientation in Windows 95 and F-PROT Professional for Windows 95 provides the user with the steps for carrying out a task, such as scanning the hard drive. F-PROT Professional for Windows 95 transparently performs a number of procedures (sub-tasks) to achieve the result while allowing the user to focus on the desired end result. This capability streamlines the task for the user.In the pages that follow, all of the items accessible from this screen are discussed. You will discover the many ways you can execute, customize and schedule scans. If you prefer to use the button bars, they are readily available. If you choose to execute one of the existing scans from the task list, it is as easy as highlighting and clicking. You can access any of the options by using a mouse or keystrokes.
The Task List shows the scan tasks currently available to protect your computer from viruses. You can work with this list in any of the several ways provided by Windows 95 described below. These include a drop-down menu, a pop-up menu, buttons, and a toolbar.
F-PROT Professional for Windows 95 allows you to control the visual display of available scanning tasks. This section covers ways of viewing the scan tasks by sizing of column headers, sorting of display order, icon size, list or detail and changing of task names. Scans can be selected and either launched or modified from this window.
Task List
The column headers can be re-sized by dragging the Split bar to the left or right.
The order in which the task names are displayed can be changed by clicking on a Column header. Clicking on the Last results header will group together all the scans that found a virus. Clicking on the Next scan on header will sort the tasks based on next scheduled scans.
Tasks can also be displayed in the task list as large icons with the name under each one or small icons with the task name alongside each one. Select View from the Menu Bar or use the Toolbar buttons to switch between large and small icons.Neither the large icon view nor the small icon view displays the column headers. However, those views maximize the use of the area for visibility of tasks as shown below.
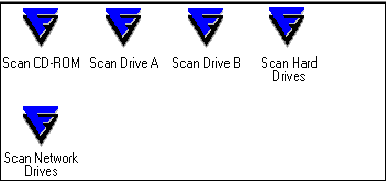
Large Icons
Tasks can be listed or they can be shown with details. Select View from the Menu Bar or use the Toolbar buttons to switch between List and Details.Select List to display the tasks using small icons and task names in a column. Column headers are not shown.
Details will display your task list using small icons, task names, results of the last scan (if a virus was detected) and the time of the next Scheduled scan. This is the only option that shows column headers.
You can rename any of the tasks by clicking once, pausing and clicking again. This opens a text box around the existing name that you can modify. If you make an error while typing, simply press the escape key and the entry will revert to its original form. Task names can be up to 255 characters: this allows you to create task names that adequately describe the scan task.
When you install F-PROT Professional you will notice that there is a blue F icon located in the tray at the bottom of your screen. You can open the program by moving yout mouse pointer over the blue F and then either double clicking or clicking the right mouse pointer and selecting Launch F-PROT.There are a lot of ways available to launch or execute F-PROT Professional operations. For example, if you like using the Command buttons or the toolbar, each is readily available. You can also point and click on one of the menu titles and drag the pointer to the available items. Alternatively, accessing an item can be accomplished by pressing ALT+ the underlined letter. To execute one of the existing scan tasks from the task list, simply highlight and click on Execute.
F-PROT Professional IconThe next section, Task Menu, covers task operations.
Main View with Pop-up Menu
You can use the Command buttons on the right to Execute the highlighted Task, modify the Properties of the highlighted task, or add a New Task. These buttons also provide quick access to virus descriptions.
While any task is highlighted, you can quickly access a pop-up menu by pressing the right mouse button. This menu allows you to execute the task, create a new task, modify the properties of the selected task or delete it.
You can access the Task drop-down menu with the mouse or a keyboard. The menu provides the ability to perform any of the operations available for creating, modifying, deleting or executing tasks.
The Toolbar shown below is accessed with the mouse. It provides the ability to perform any of the operations available for creating, modifying, deleting or executing tasks.
| This button from the toolbar changes your cursor into an arrow with a question mark. When you point and click on an object, you will bring up a help screen that is relevant to the object you clicked on. |
Within F-PROT Professional for Windows 95, you can activate a shortcut menu that allows you to perform fast and efficient virus scans of selected folders or files. The items to be scanned can be located in Windows 95's Explorer, on the desktop or withing program groups.
Shortcut Menu Scan
To perform a scan from the shortcut menu, use a right mouse click to highlight a filename or folder to scan. A Windows 95 shortcut menu containing an F-PROT Virus Scan option will appear. Select that option by using either a right or left mouse click. The scan will begin immediately.
 |
When you scan a folder from the shortcut menu, its sub-folders are scanned as well. Scanning from the shortcut menu can be performed only on individually chosen files or folders. Groups of files or folders cannot be tagged for scanning. |
Another way to scan files quickly is to use the drag and drop feature in F-PROT Professional for Windows 95. To use this feature, you must have the F-PROT Professional interface opened on your desktop. From Explorer or from the desktop, click on the object you want scanned and, while holding the mouse button down, drag the files or folders anywhere over the F-PROT Professional window and then release the button. When the mouse button is released, the scan starts immediately and a report window appears when the scan is complete.
 |
The drag and drop properties are based on F-PROT Professional's default scan. Thus, if a virus is found, you receive notification only. You must then scan the file with a task that allows disinfection or whatever other action you use for viruses. You can create a custom drag and drop task by performing the following steps: |
The file created is named DragDrop.FPT.
The Task Menu offers the ability to Execute a pre-defined task, create a New task, Delete a task, or Edit an existing task. Further, the Task Menu allows you access to Properties in order to review or modify an existing task or Exit from the program. To access the Task drop-down menu you may either point to it and click or press ALT + T.
You select a task by clicking and highlighting it first. When Execute is chosen, the task will begin. The screen below shows the results of a scan.
 |
Selecting a task and then clicking the Execute button on the toolbar provides a quick way to access this option. |
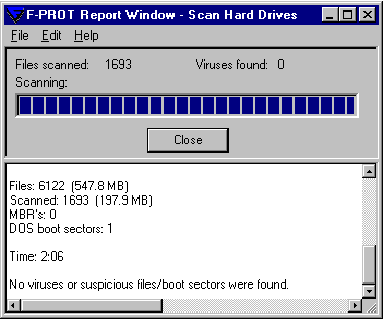
Scan Results View
You will receive a report when the scan is completed. Use the scroll bar on the right to view the entire report. You can use the File menu to save a copy of the report, print the report or send a copy of the report through your e-mail system. You can also use the Edit menu to copy it to the clipboard for pasting into another document.If a virus is found during the scan and the Action to take setting is Report only, a screen like the one shown below will inform you of the infection. Press OK to continue so you may manually disinfect.
 |
To prompt for disinfection, change the Action to take setting to Disinfect/Query and allow F-PROT to disinfect the virus. |
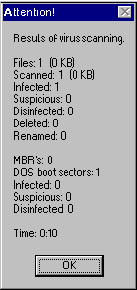
Virus Found
Choosing New from the Task menu allows you to create a new custom task. A box will appear where you must provide a name. It will then display the Properties menu where you can establish the task parameters.
 |
As an alternative to choosing New from the Task menu, you can choose the New button from the toolbar. The New button provides a shortcut to creating a new custom task. |
Selecting Delete from the Task menu allows you to remove a pre-defined task.
The Edit item on the Task menu allows you to Cut, Copy or Paste a task. For example, if you highlight ScanHard, then Copy it and click on Paste, it will create a new task entitled Copy of ScanHard. You can then rename it or change the properties.
 |
Instead of choosing the Cut item from Task menu, you can use the Cut button located on the toolbar. That button allows you to delete a task and save it to the clipboard. From the clipboard, a subsequent "Paste" will return it to the task list. |
 |
As an alternative to using the Copy function on the Task menu, you can choose the Copy button from the toolbar. The Copy button allows you to create a copy of the task in the clipboard. A subsequent "Paste" returns it to the task list. |
 |
You can use the Paste button from the toolbar as an alternative to choosing the Paste item on the Task menu. This button allows you to place a task in the task list. After a task has been either cut or copied, it can be pasted to that list. The name of the task will start with the phrase "Copy of". You can then modify and rename the task using the other available options. |
 |
The Properties menu allows you to modify a pre-defined task. You can select theAction to take, Drive/paths to scan, Files to scan and Schedulewhen the scan will take place.
In addition to choosing the Properties item from the Task menu, you can also use that item by selecting a task and then clicking on the Properties button in the toolbar. |
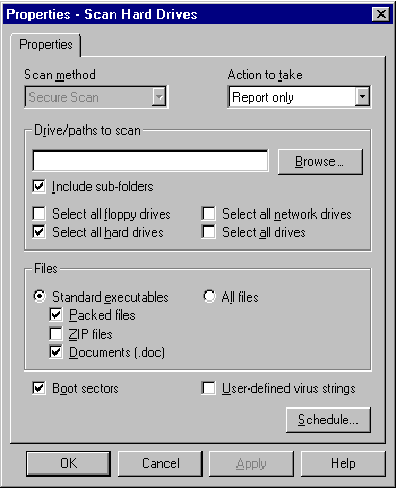
Properties Menu
Secure scan
This is the default scanning method that searches for code that has been established for over 8,000 viruses and variants.
If F-Prot Professional finds a virus, you can have it perform one of the actions listed below.
Report only
This will inform you when a virus is detected; however, no other action will be taken. You may choose Report only in order to verify the type of virus before disinfection.
Disinfect
Disinfecting files automatically causes the least disruption to the user. If disinfection is not possible, F-PROT will ask if you wish to delete the file.
Disinfect/query
The Disinfect/query option will identify a virus and ask if you wish to disinfect it.
Delete
 |
This will automatically delete any file found to contain a virus.
While Delete is a powerful option, the potential exists for loss of data. Some rare viruses perform encryption on the hard drive that can make file recovery difficult. |
Delete/query
Choosing Delete/query will identify a virus and ask if you wish to delete the file that contains it.
Rename
Selecting Rename will automatically rename an infected file by putting a "V" in place of the first letter of the extension. For example, .COM becomes .VOM and .EXE becomes .VXE.
Rename/query
This will identify a virus-infected file and ask if you want to rename it. If you choose yes it will rename the file as described above. If you choose no you will then need to either disinfect or delete the file.
Remove all macros if a variant is found
If this option is selected, all mascros are removed from any file containing a new or modified variant of a macro virus. If this option is not selected, and the Actio to take is Disinfect or Disinfect/Query, files that contain remnants or are variants or macro infections are renamed.This is available only when the Action to take is Disinfect or Disinfect/Query.
You can provide a specific list of drives or paths to scan. For example, you could establish a task that would perform a scheduled scan twice a day on the directory used to store files downloaded from other computers.
Browse
The browse button opens a dialog box that allows you to select the folder you wish to scan.
Include sub-folders
This searches all sub-directories on a selected drive.
Select all floppy drives
This searches all floppy drives.
Select all hard drives
This searches all logical hard drives on the local workstation, including compressed drives.
Select all network drives
 |
This will search all network drives for which you have access rights and have been mapped to. |
Select all drives
This searches every drive that you have access rights to.
The list of available file options are described below. The recommended choice is Standard executables. You also have the option of selecting All files but they are mutually exclusive. The compressed file options may be checked individually depending on your needs. Choose the documents option only if you have Microsoft Word 6.0 or later.
Standard executables
These are the files that normally would be attacked by a virus. These extensions include .386, .COM, .DLL, .DRV, .EXE, .FON, .OV?, .SYS, .VXD.
All files
This will scan all files. It is not a recommended option as it increases the probability of getting a false positive from a random string of characters in an otherwise harmless data file. Further, All Files takes much longer than using the other scanning options and it is unlikely to find additional viruses.
Packed files
These are files that have been compressed with PKLITE, DIET or similar programs.
ZIP files
These are files that have been archived using PKWare's ZIP compression utility.
Documents (.DOC)
This checks for the species of macro viruses which can infect Microsoft Word document files by modifying the default template.
The most common viruses infect the boot sectors and master boot records of hard drives. Checking this option will cause these areas to be scanned.
Occasionally a new virus spreads before we can release an update to FPROT. You can enter a string of characters (in hex) that provide your current version with the ability to detect the new virus. For more information see the Preferences Menu section.
Scheduled execution of the selected task can be a very useful anti-virus tool. After you have defined a scan, you may use Schedule to assign the time for the scan to occur.F-PROT Professional for Windows 95 does not need to be opened for a scheduled scan to occur. F-Agent, however, needs to be running. This may be confirmed by looking for the blue F icon on the Taskbar. When the schedule time is reached, the report window will open and the scan will begin.
You may create schedules for several different scans, but they can not be run concurrently.
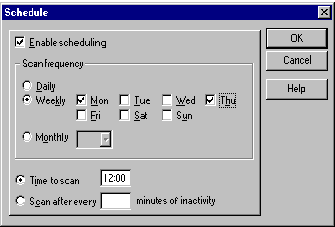
Schedule Menu
Enable scheduling
 |
Checking this box turns scheduling on. If this box is not checked, scheduled scanning will not occur. |
Scan frequency
Select how often a scheduled scan should occur. You may select only one option.
Daily
Select the Daily option if you want a scan to take place each day.
Weekly
When you select the Weekly option, you may then select the day or days on which you want a scan to occur.
Monthly
If you select the Monthly option you will then have access to the drop-down dialog box which allows you to select the day of the month you want the scan to occur.
Time to scan
Specify time of day in 24 hour format with 00 indicating midnight. Scheduled scans will be skipped if the computer is not on during the time you have entered.
Scan after inactivity
You can choose to scan after a specified period of inactivity.